Quickly Learn to use SIX ERP
Purchase Management
Purchase Management
Introduction
Purchase is the procurement management tool of SIX. It provides a real time cost control on the entire procurement process and all related activities:
- Purchase planning
- Purchasing
- Digital approval
- Budget tracking
- Vendor management
- Contract Management
- Invoice management
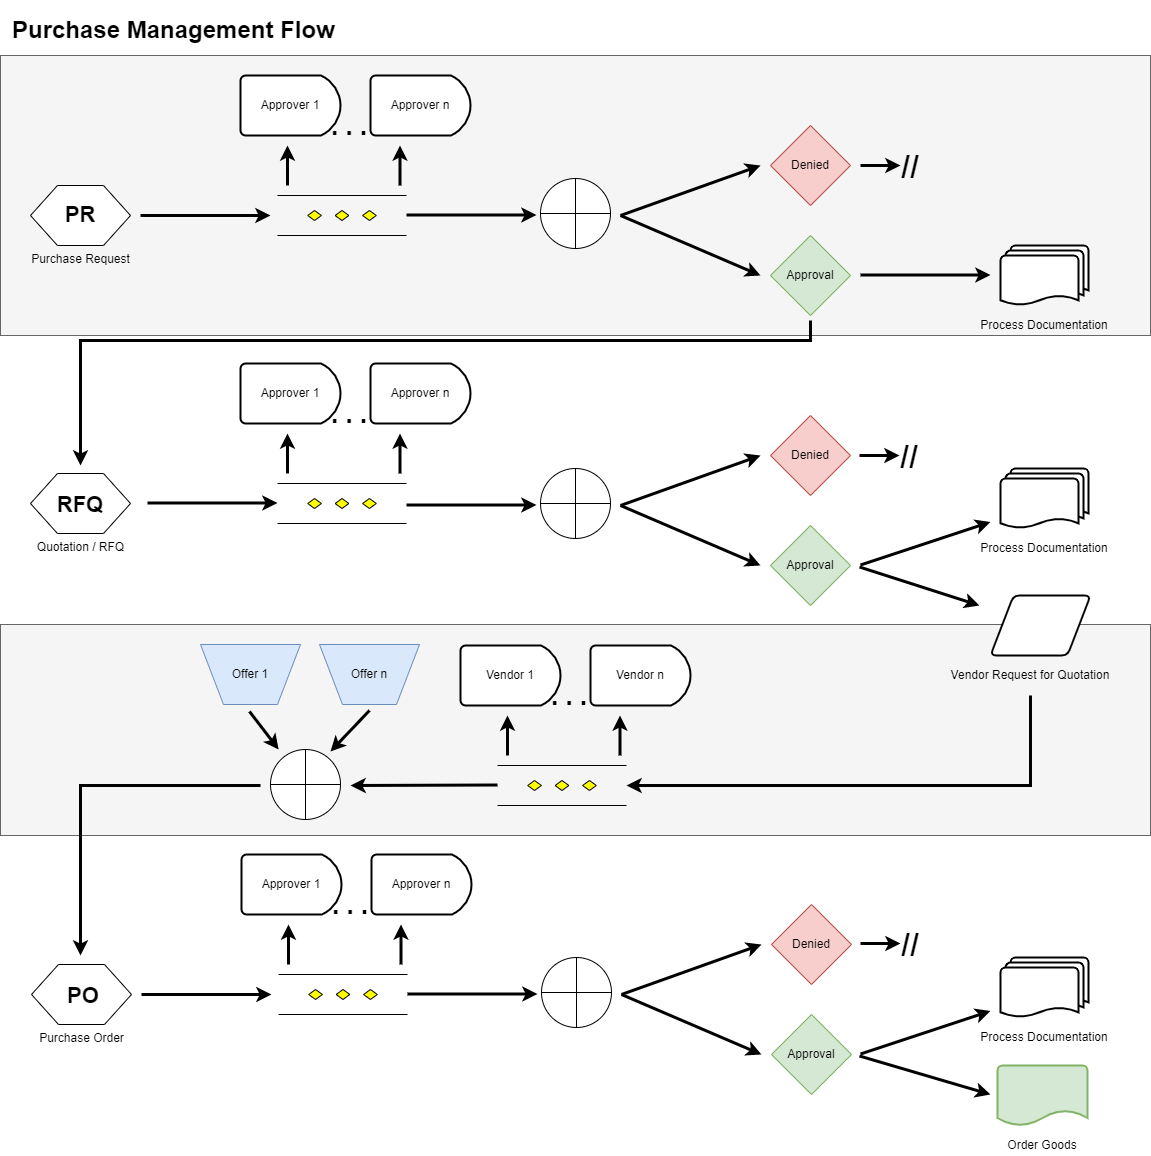
General Purchase Management Process Flow
Depending on your companies workflows, various processes with deviations based on system setup can be achieved. For a full control over the buying process, however, a full procurement process should be highly desired.
Items Catalog
Items is a view of the Inventory catalog (available as dedicated module in SIX) with products available for purchase.

To View item details, click on the Product name or on the "3-dots" icon at the end of the row.
To Delete an item click on 3-dot icon and then "Delete" to confirm.
To Search for a particular item, type a text on the search box in the top right corner of the items screen. Alternatively press Shift - D to focus on the table search bar and type the search term
To Edit item details, click on the "Edit" link below the name of the product. In the pop-up make necessary modifications.
Add Items
To Add a new item (product or service) click on the "ADD" button on the top left of the screen.
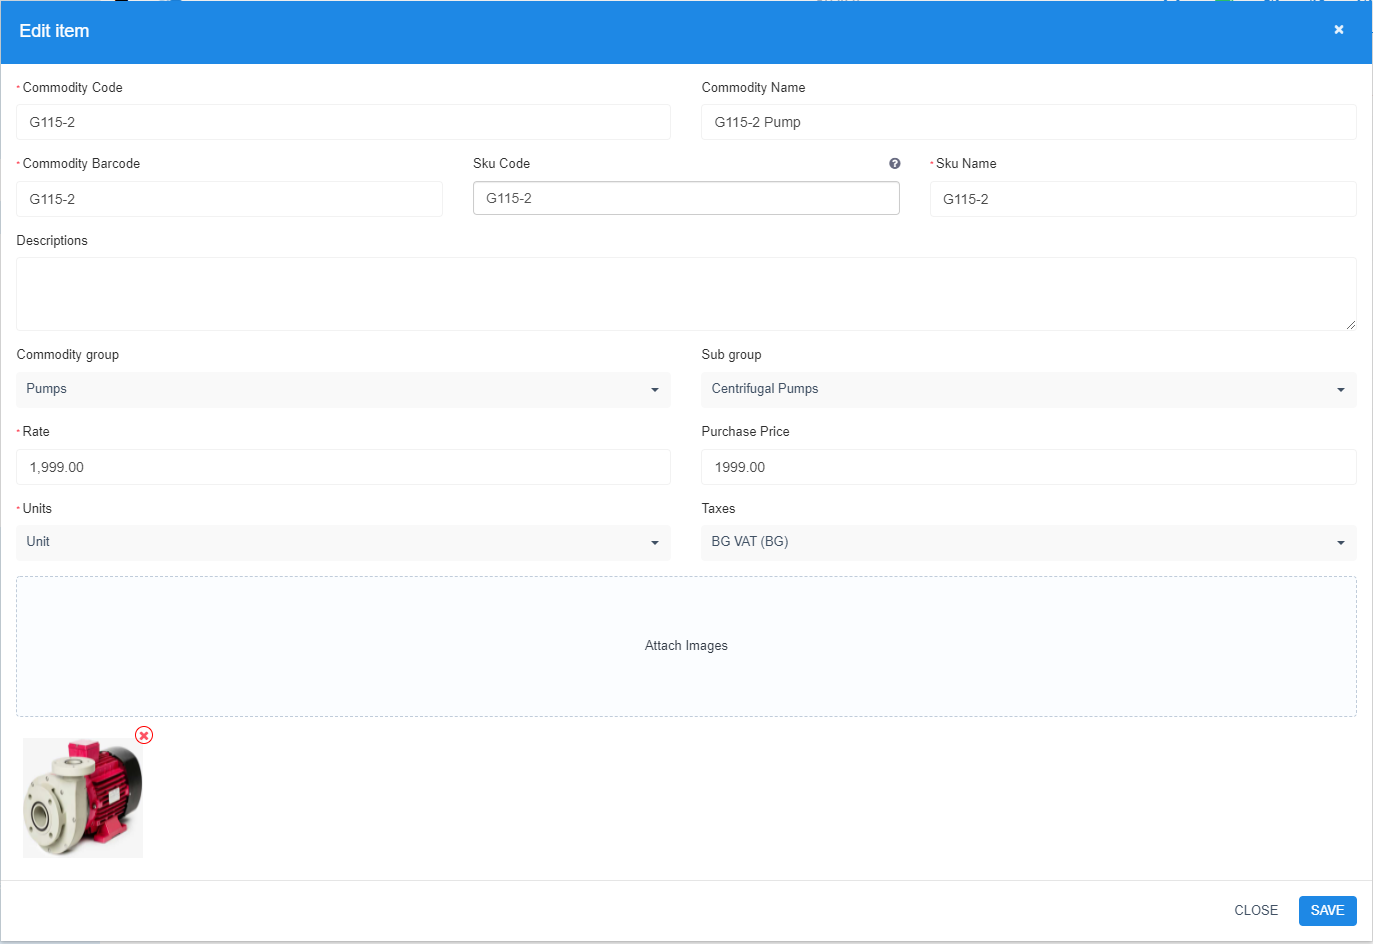
In the pop-up create the new item by filling in its properties:
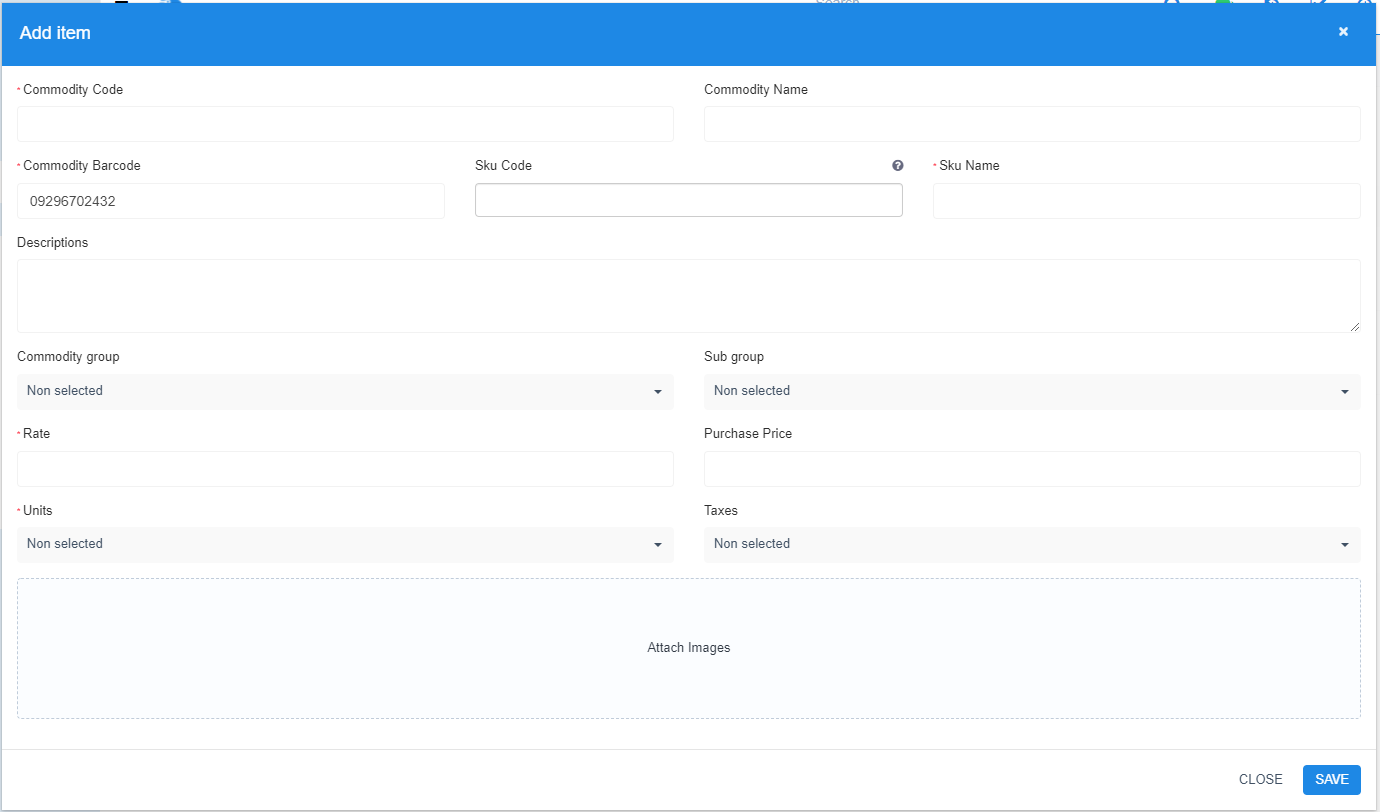
Available item/service/product properties:
- Comodity Code and Commodity Name
- Commodity Barcode
- SKU Code (first character of Group code and Sub group code and ID) and SKU Name
- Description - text description of the item
- Commodity Group and Sub Group
- Rate (Selling price of this item)
- Purchase price (Cost)
- Units (unit, kilos, boxes etc)
- Taxes (VAT)
- Attached images
Export Items
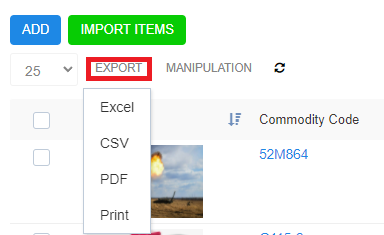
To Export items list in a file (xls, csv, pdf) or to print it, click on Export button and choose one of the possibilities.
Delete Items
To Delete the items from the inventory list, select them by ticking the box ![]() in front of the item name. You may select one or many items at the same time.
in front of the item name. You may select one or many items at the same time.

Once items are selected, click on "Manipulation". In the opening security dialog, tick "Mass Delete" and press the "Confirm" button to verify the Delete Operation.
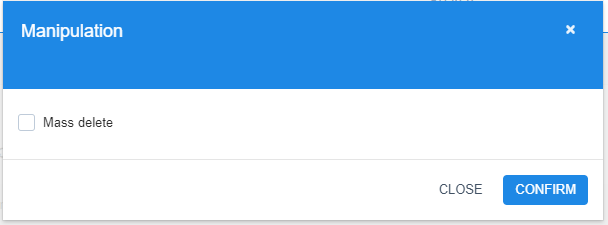
You can delete up to 999 items at the same time. Be careful what you do!
Importing Items from Excell
To Import a bulk list with items click on the "Import Items" button.
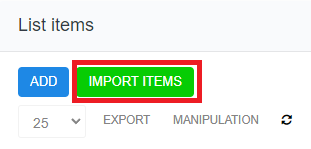
For forther instructions on the importing process and the preparation of your XLS file please follow the manual on the Import Screen by clicking "Import Items".
Download a Sample Item Import File
Click the ![]() Download Sample button to receive a properly formatted XLS file.
Download Sample button to receive a properly formatted XLS file.
When opening the file, you should see preformatted headers, indicating the fields you will need to fill to get usable item records for managing Purchases.

Import Fields:
- Commodity Code
- Commodity Name
- Commodity Barcode
- SKU Code
- SKU Name
- Item Description
- Unit
- Commodity Group
- Commodity Sub Group
- Purchase Price
- Rate (Sales Price)
- Tax
Preparing the Import File
A readily made import file should be in .xls or .xlsx format, following below rules:
- Columns with the symbol "*" are absolutely required.
- Minimum Required Columns: "Commodity Code", "Commodity Name" and "Purchase Price"
- The column "Tax", enter "ID" of tax or "tax name"
- In case you are using an entirely new Excell file and compose it yourself, make sure that ALL fields are formatted in "TEXT".
For convenience of importing, make sure your data is consistent, so double check your data. Currency fields eg. Purchase price should use the dot (.) as a decimal separator. Please do not use any further formatting.
Importing Items from Excell
Select prepared MS Excel file by clicking the "Choose File" button. Click the "Import" button to start the importing process.

At the end of the importing process you will receive confirmation of the amount of imported products/items.
Adding / Editing Vendors
To add a new Vendor or Supplier, navigate to Purchase → Vendors and click the "New Vendor" button on the top left of the screen.
Activating / Deactivating Vendors
Use the "Active" toggle to deactivate a Vendor. Once toggled inavtive the Vendor can not be used in any Purchase Related process.

Deleting Vendors
To delete a vendor hover over the Vendors name and click "Delete". Alternatively you can delete multiple Vendors at by ticking the checkbox ![]() in front of the vendors data-line. Once ticked click on "Manipulation" on top of the Vendors list and for security tick "Mass Delete" and confirm your choice by clicking the "Confirm" Button
in front of the vendors data-line. Once ticked click on "Manipulation" on top of the Vendors list and for security tick "Mass Delete" and confirm your choice by clicking the "Confirm" Button

Vendors Profile
To access a vendor's profile, click on the Vendor's name in the list:
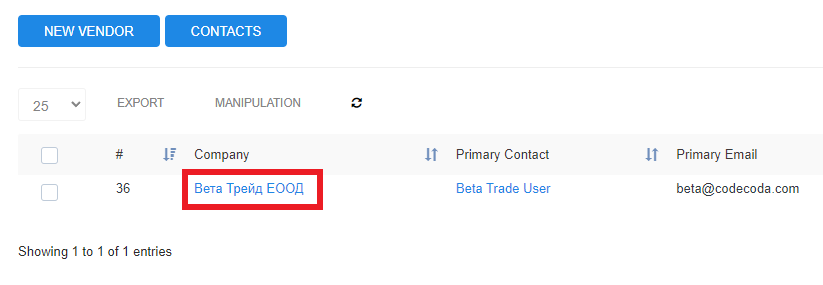
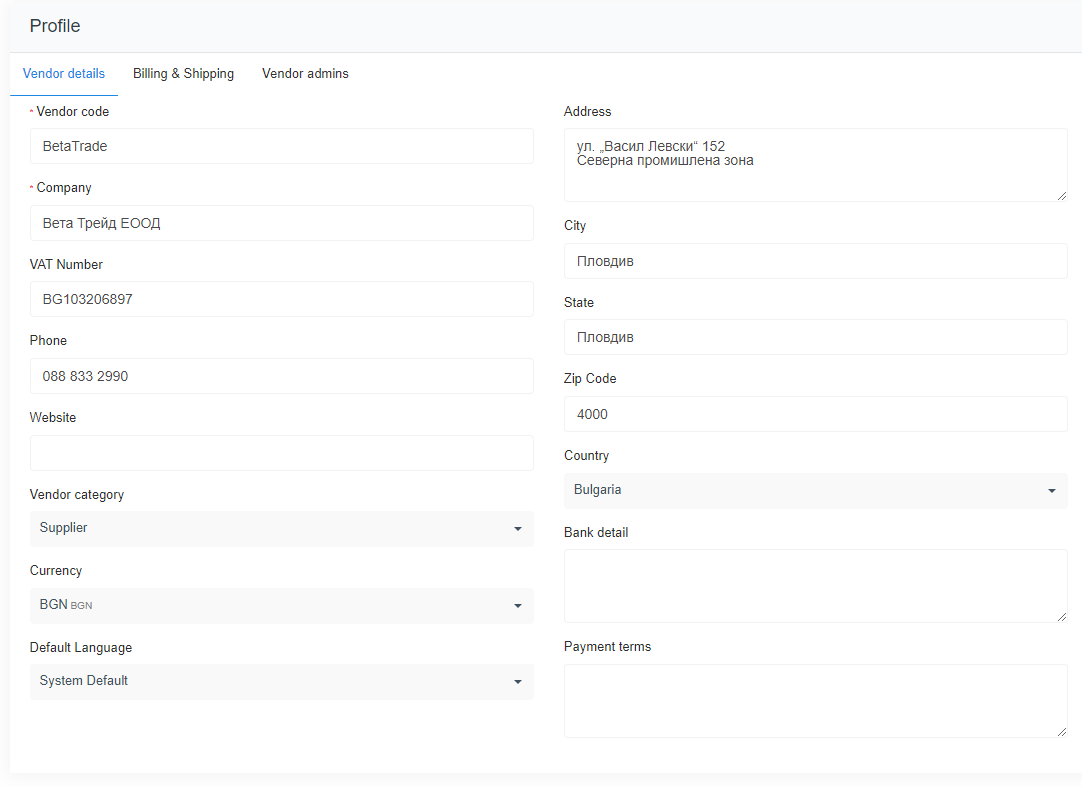
To access and manage general information for the vendor, go to Vendor Details tab:
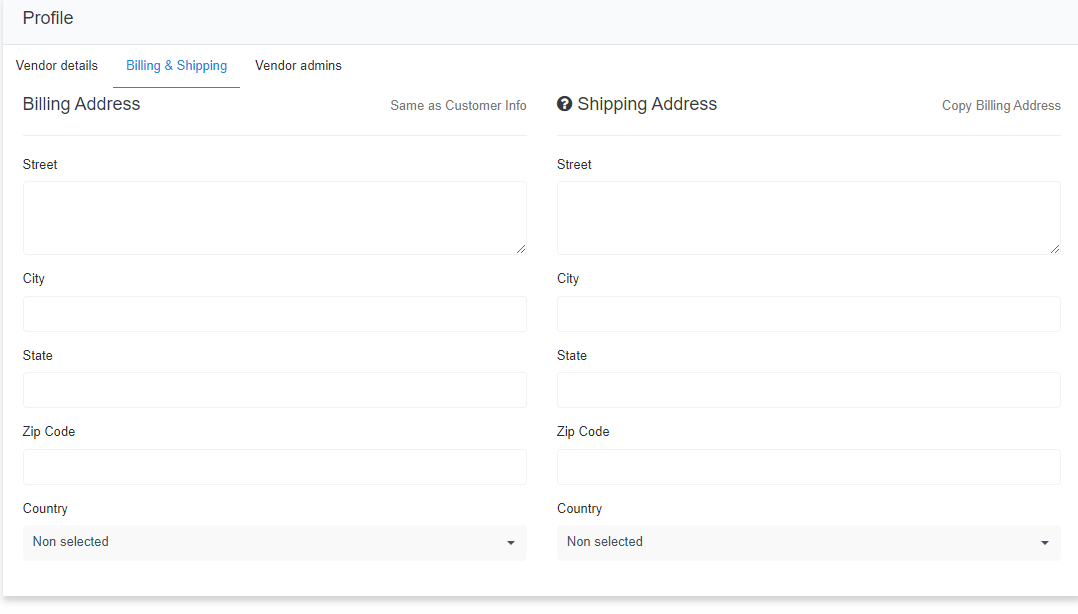
To manage Vendor's billing and shipping adresses go to Bulling & Shipping tab:
Admins assigned to the vendor are listed in Vendor Admins tab. To assing new admin to particular vendor, hit the Assign Admin button:
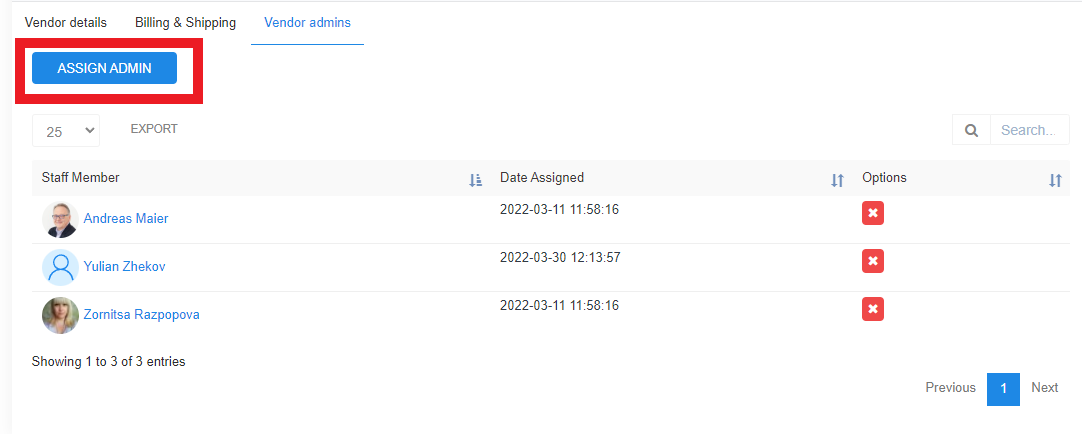
From the popu-up select a new admin from the drop-down list with available admins. Multiple selection is possible.
Vendor Contacts
To access the Vendor contacts, click on vendors name in the list. Multiple contacts are available for single Vendor:
 Then go to Contacts

To Add a contact hit the New Contact button. In the pop-up fill in the new contact data
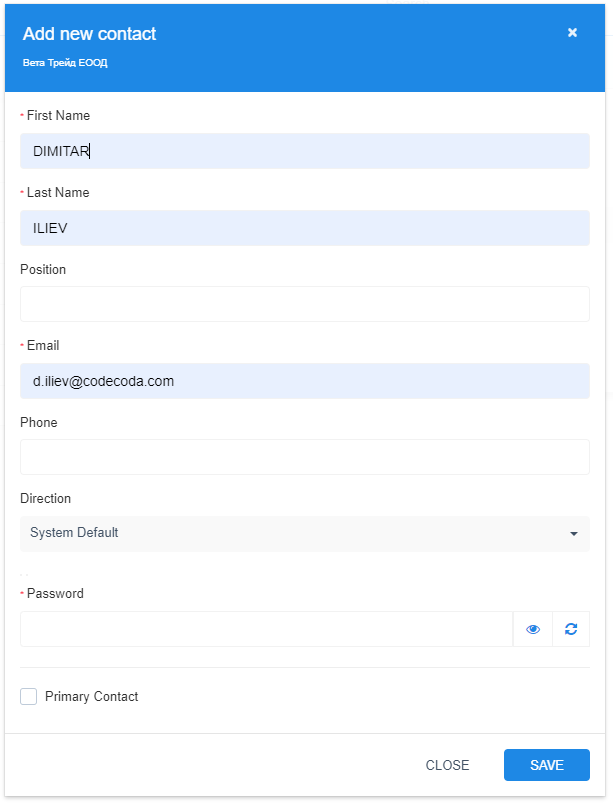
To set typing Direction in the interface, choose RTL (right to left) or LTR (left to right)
To set the contact as Primary for particular vendor, check the Primary Contact check-box
To Edit existing contact, click on the Name in Contact list or hover the mouse over the contact name in tle Contacts List and click Edit.
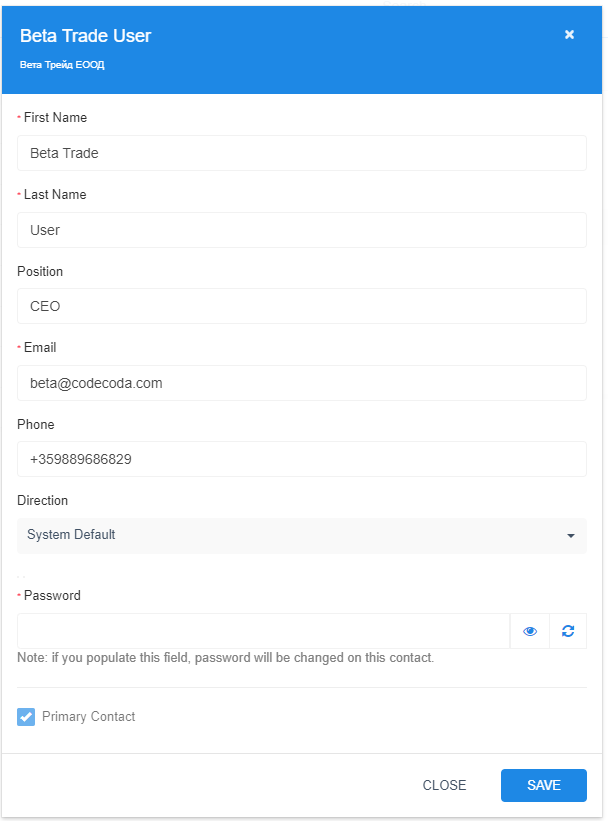
To Delete contact, hover the mouse over the contact name and click Delete
Vendor Contract Management
To view or Modify Vendor's contracts, click on Contracts in the Vendors sidebar:

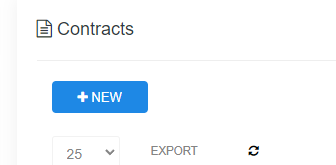
To create a new contract with the vendor, click on +NEW button.
In the Create new contract screen add all requsites related to the new contract:
Contract description and Category
Related Project, Purchase Order, Department
Vendor, dates and payment terms and condiions
Signature status and date of signing
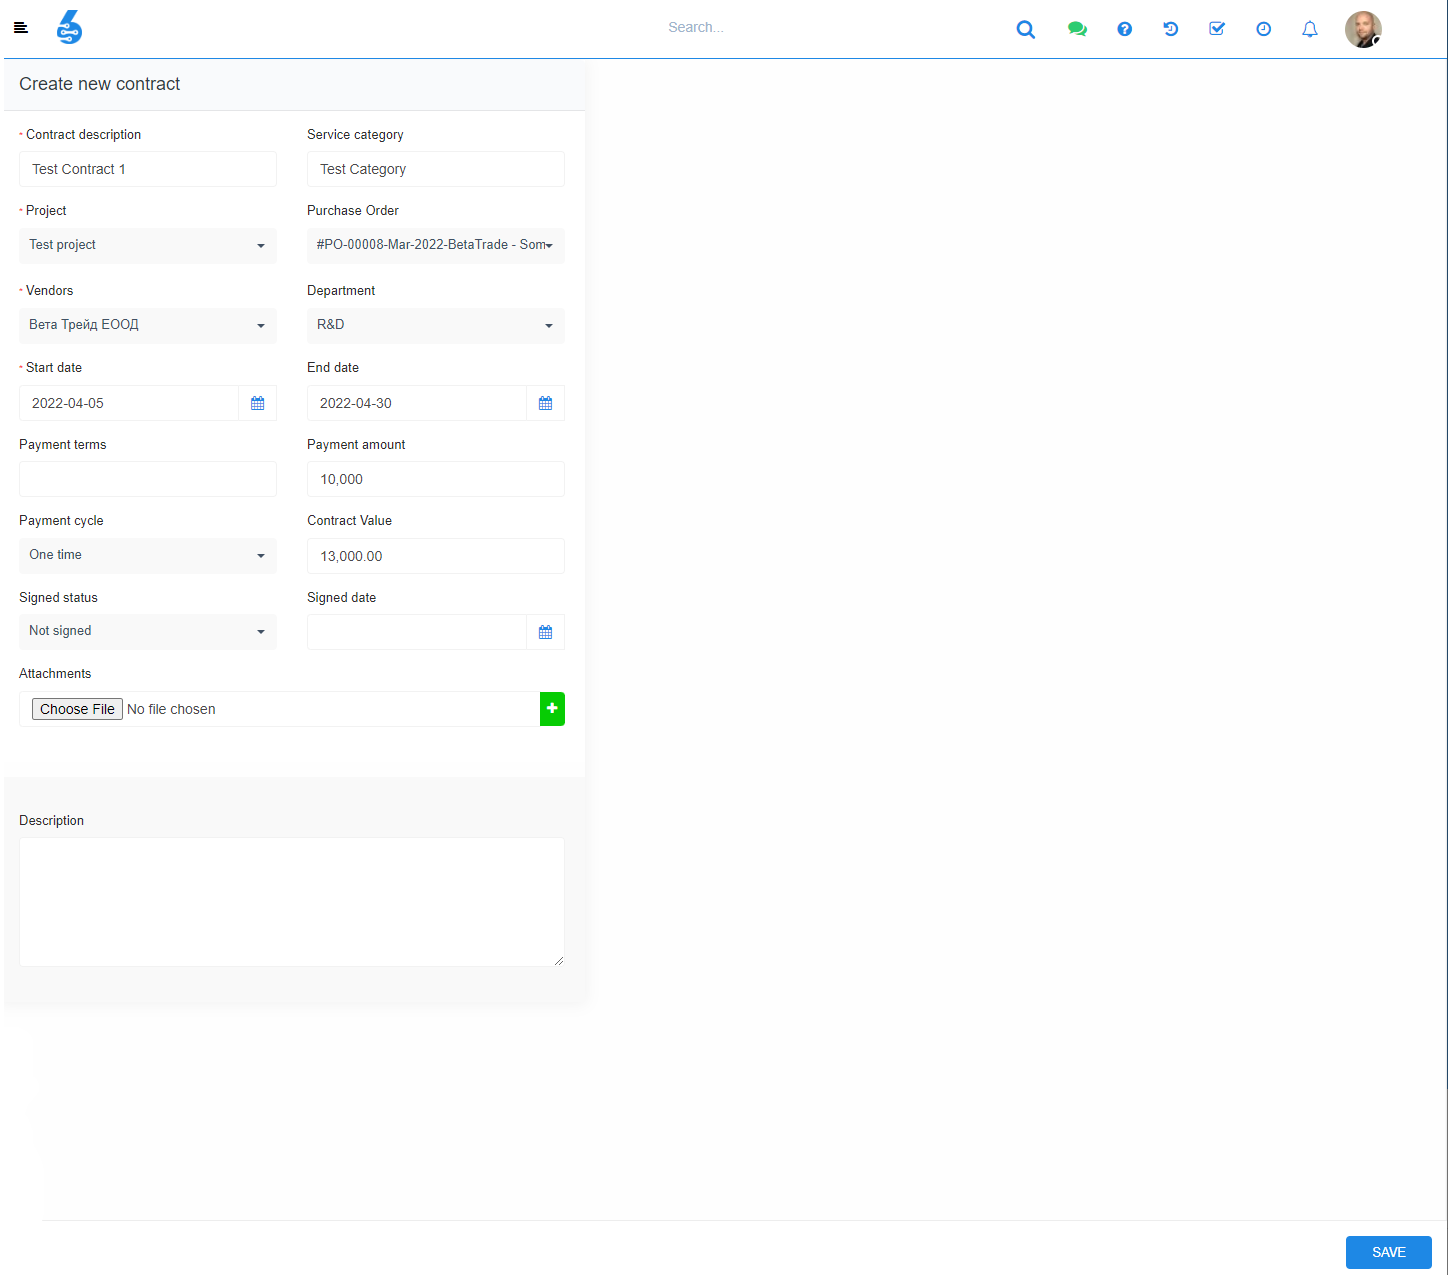
When all detailas are filled in, hit the SAVE button in the bottom right.
To Access existing contract, hover the mouse over the record and click View/Edit or click on Contract description:
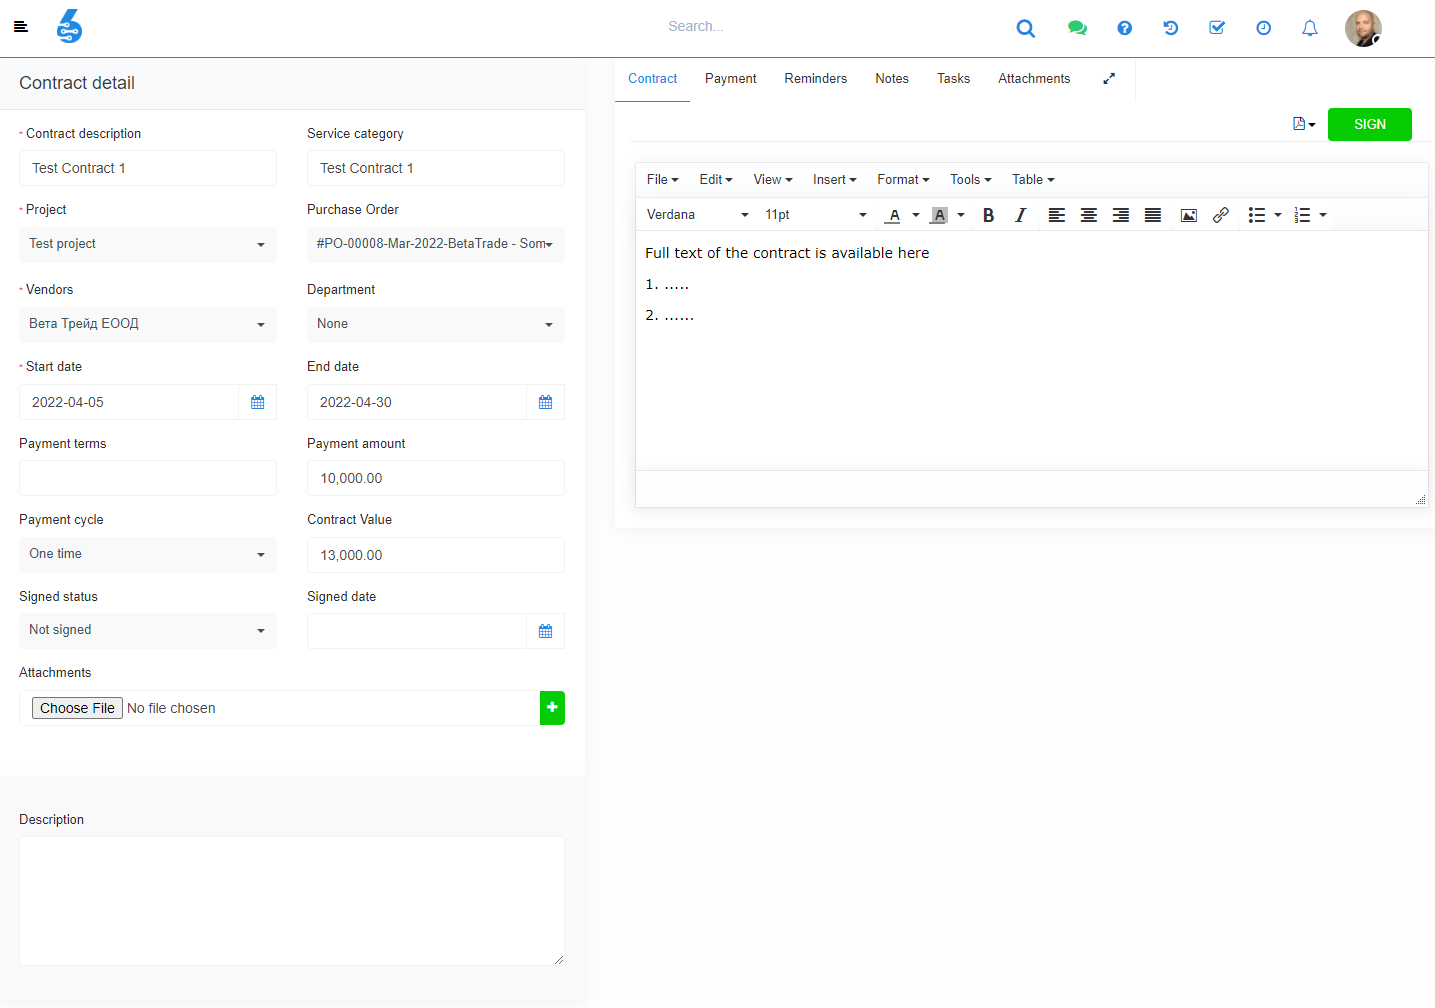
The whole text of the contract is available in Contract tab in Contract details screen. Click on Sign button to sign the contracts:
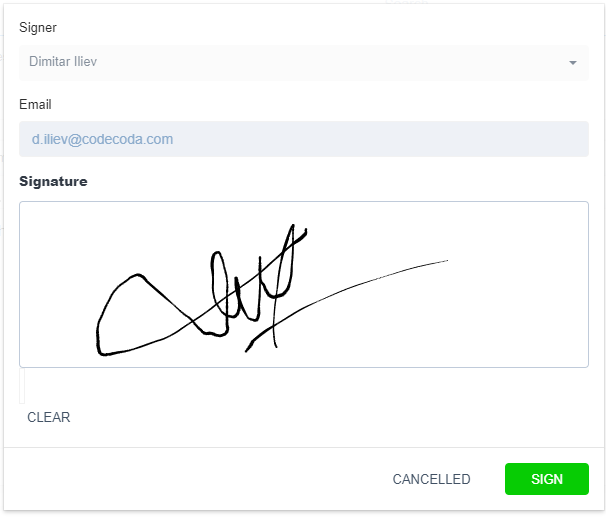
Hold the mouse button and draw the signature. Click on Sign
To see all payments related to the contract go to Payment tab.
To assign a reminder to the contracts, go to Reminders tab. Click on Set Estimate reminder button.
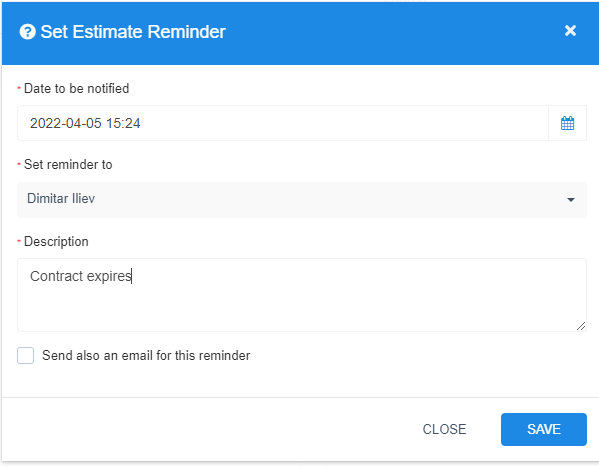
Set date and assignee. Describe the purpose of the reminder in Description field. Click Save.
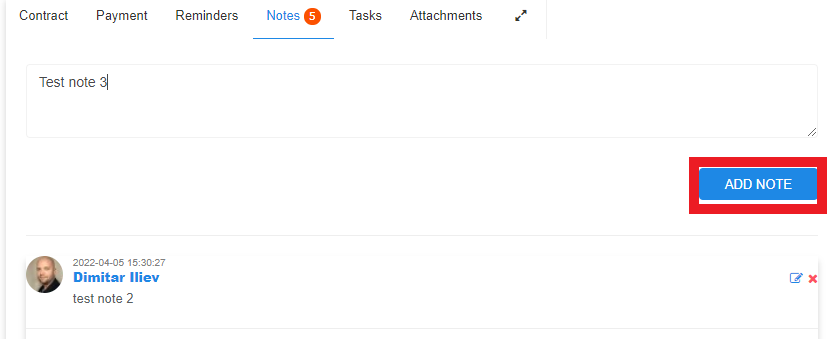
To assign a new contract related task, go to Tasks tab.
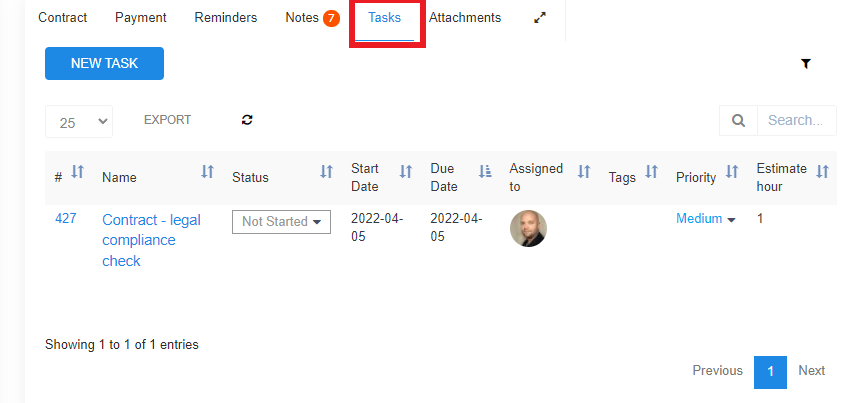
To view/edit existing task, click on the task name in the list.
To add new task, clisk on New Task button. In the opened screen put the task requisites:
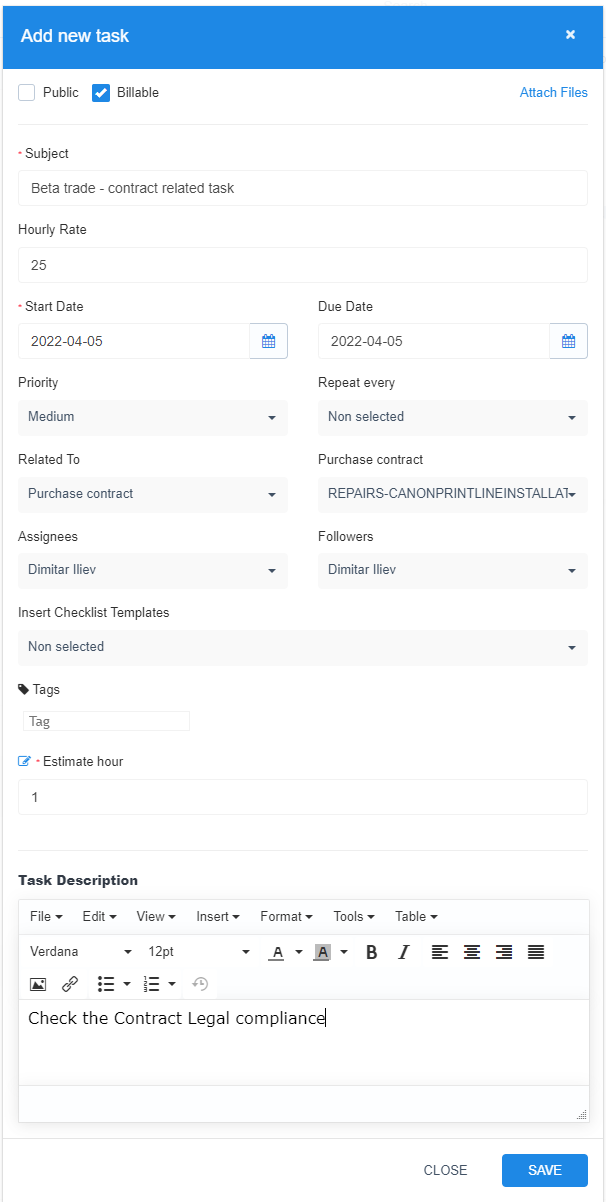
Required information for task creation:
- Subject - or an appropriate name for the task.
- Start Date - when the processing of the task should be commenced.
- Task Description - an appropriate task description, which allows task execution for the Assignee(s).
When creating tasks from within a Contract, the task will be automatically associated with the Contract.
Private and Billable:
Tasks are commonly assigned to one, or many staff members for execution. Assigned staff members will always find their tasks by using the "Tasks for me" filter reached from the ![]() icon, found in the top right corner of the Task List Screen. On some occasions we want to make tasks public, this is when we want staff members, who are outside of the scope of a task need to cooperate. This can be simply achieved by checking the respective checkbox in the head section of the task generation form.
icon, found in the top right corner of the Task List Screen. On some occasions we want to make tasks public, this is when we want staff members, who are outside of the scope of a task need to cooperate. This can be simply achieved by checking the respective checkbox in the head section of the task generation form.
![]()
On some occasions, tasks will be billable to clients, this is for example the case when the company sells work-time to their clients on eg a time and material basis. Billable works in conjunction with "Hourly rate", on which you can set an hourly price for the executed task.
Task Repetition:
Some tasks will be one-off, other tasks will be recurring. You can set the frequency of tasks by selecting from the respective menu item.

Then click Save button.
To attach files to particular contract, go to Attachments tab.
Purchase Orders
A purchase order (PO) is a commercial document and first official offer issued by a buyer to a seller, indicating types, quantities, and agreed prices for products or services. It is used to control the purchasing of products and services from vendors.
To access POs related to particular Vendor, go to Purchase Order module in Vendor Details.
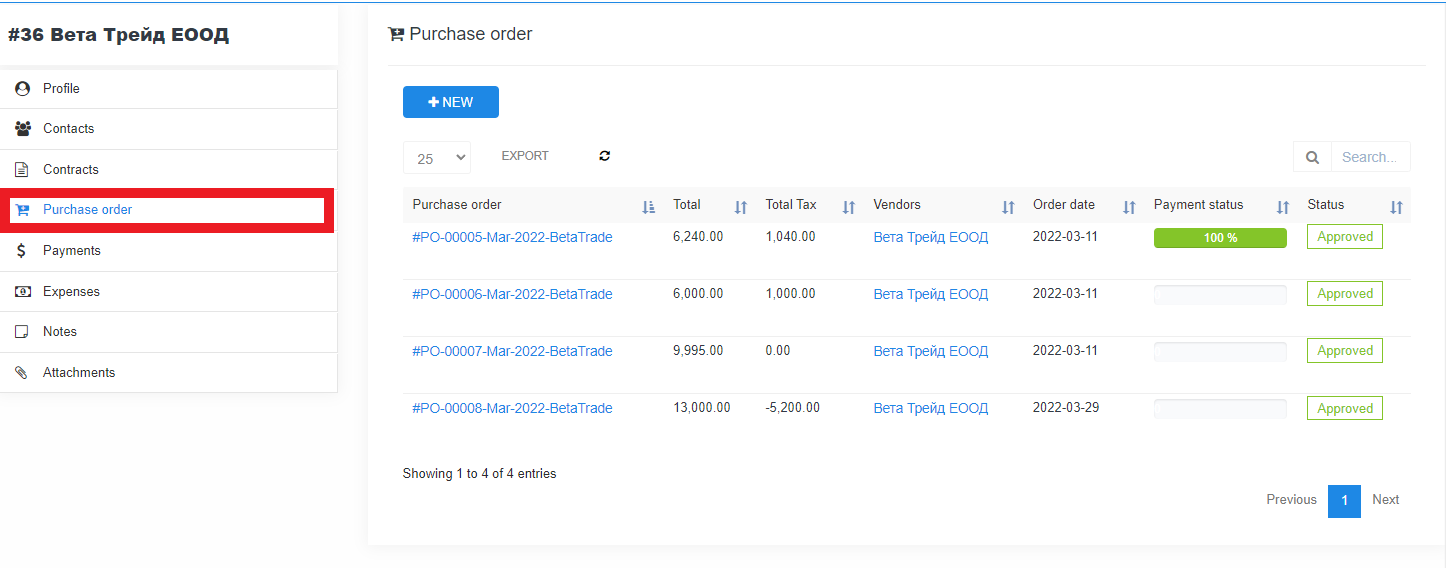
Click on PO name to see PO details in dedicated Purchase Order module.
To create new PO, click on +NEW button.
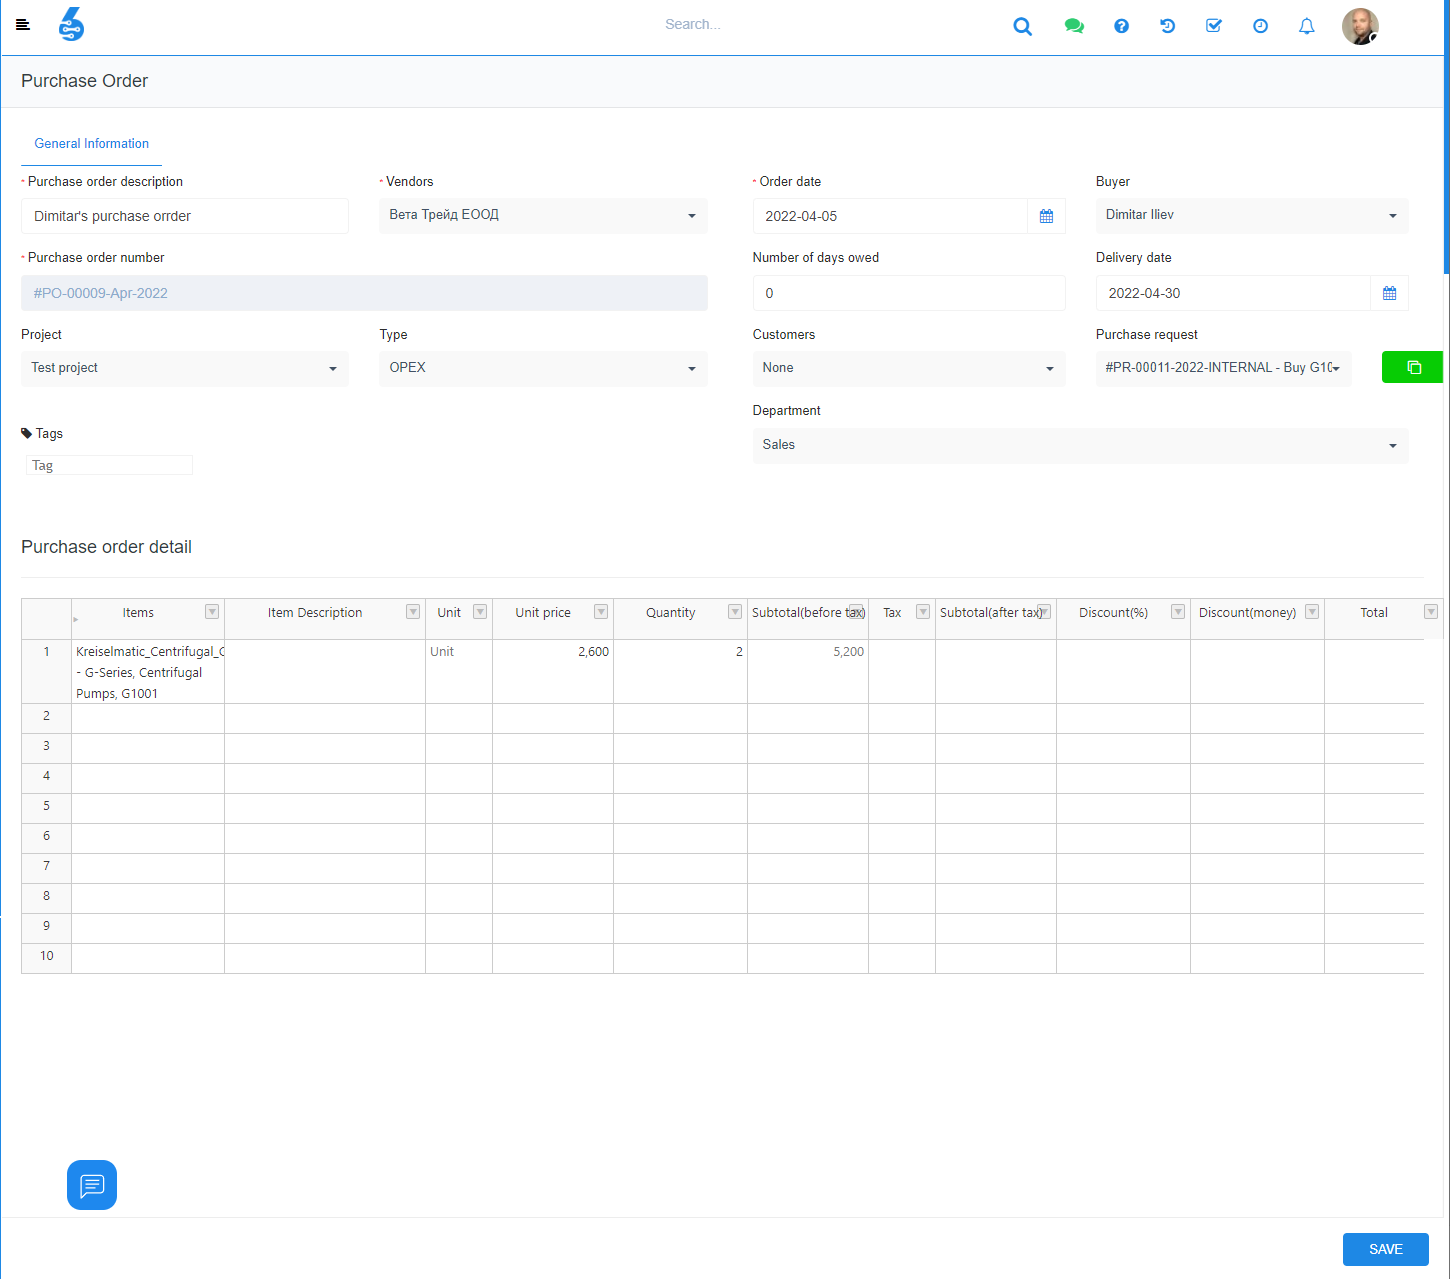
In PO creation screen set the PO mandatory requsites:
Description - free text description of PO purpose and content.
Vendors - select supplier from the drop-down menu
Order Date - select date from which the order become effective.
PO number - Automaticaly generated
Other requisites:
Project - select a project, related to the PO if purchased products are under the project's budget and/or are relevant to project needs.
Type - select the type of spendings - capital (CAPEX) or operating (OPEX)
Customers - in case we wan't to sell a product to our customer and we purchase it from a Vendor, select the customer from the dropdown menu.
Purchase request - if we want to use an existing purchase request to form the PO, select it from dropdown menu. To copy the items from PR to PO, click on the green button.

Department - if purchased products are under a budget of particular department and are relevant to department needs.
Purchase order detail
To place an order for specific product, it should be available in Items list. Double click on the first cell in Item column and list of availabel items will appear.

Or start to write item's name in the cell, and sustyem will auto suggest the name of the item. Select the item. System automatically will display predefined unit and price.
Select desired quantity and modify the price according requested parameters. Select requested discount and specify taxation method.

The system will calculate the subtotal and total price.
Click Save. The PO is send to approval
Purchase invoice
When a Vendor receives the PO, he issues an invoice on it. To keep track record for the invoices from particular Vendor, the invoices need to be registerd in the system.
Click on Invoice No to see Invoice details in dedicated Invoices management module.
To register a new invoice record to certain PO, go to Purchase invoice menu from the Vendor sidebar:
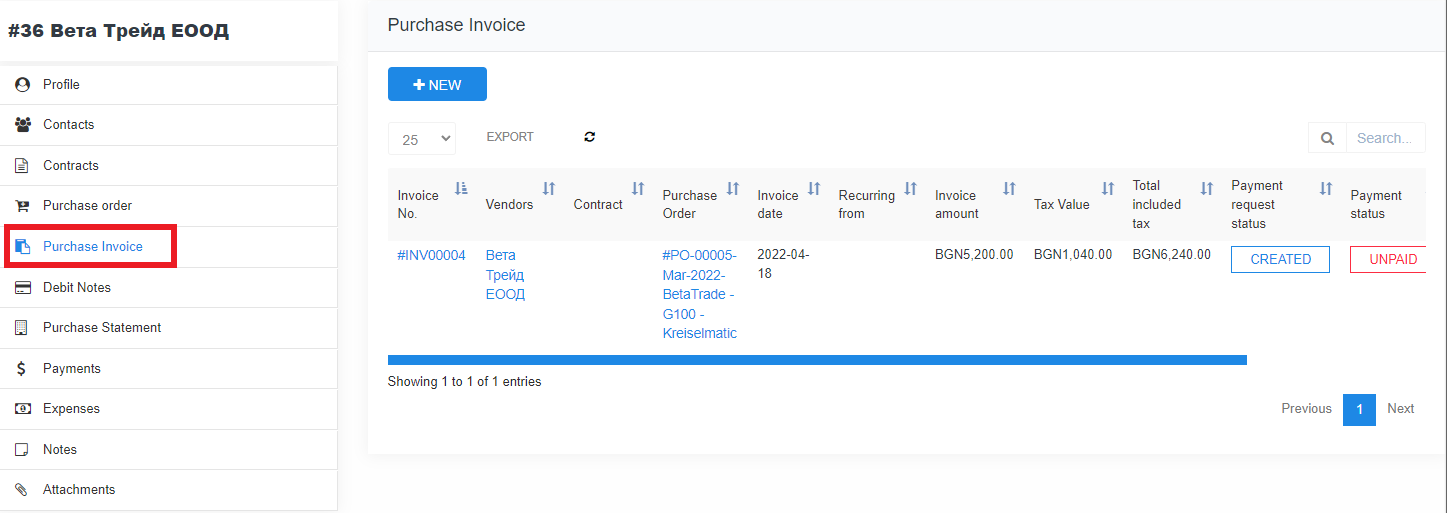
A list with Invoices issued by the particular vendor is available. To create a new one, click on +NEW button.
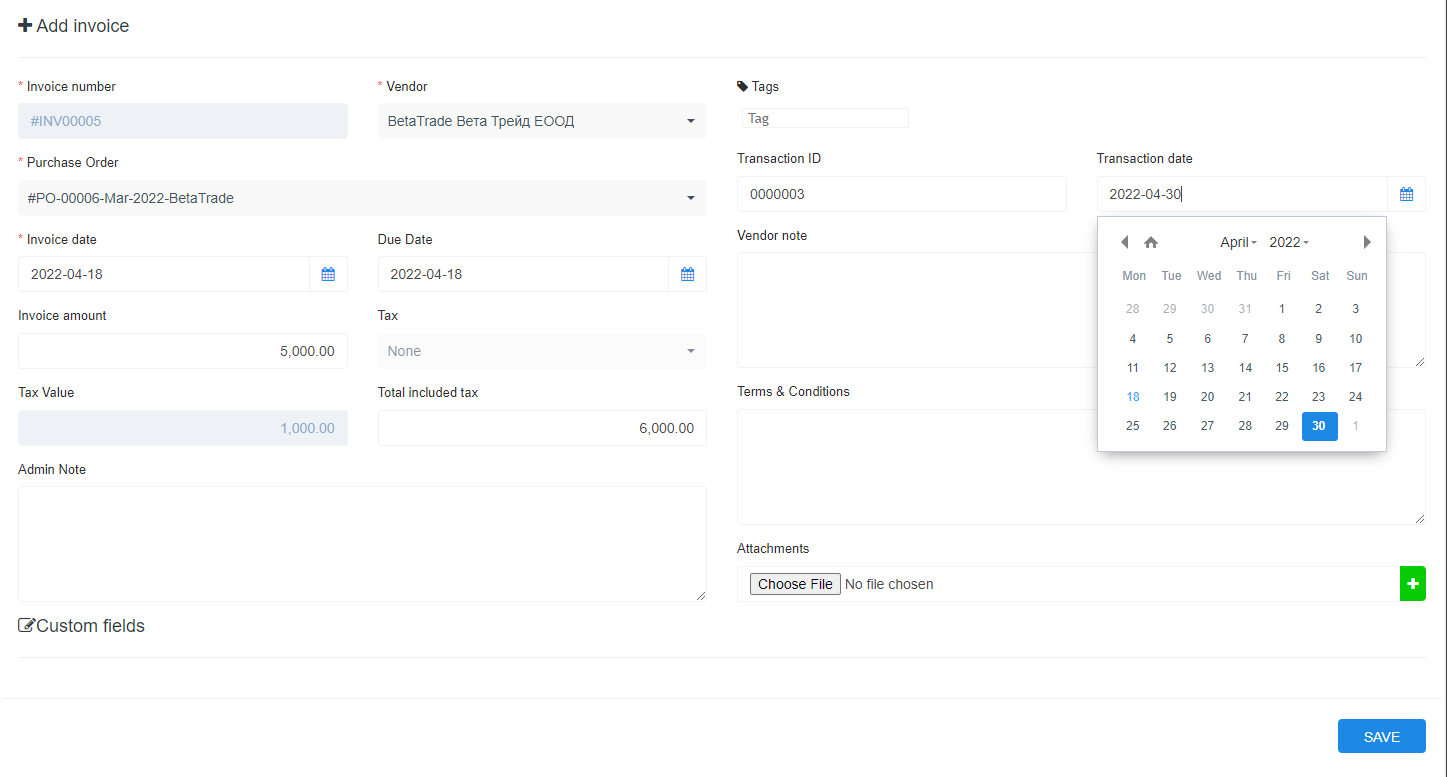
Invoice Number is automatically generated by the system
Choose Vendor and related PO with respective Invoice and Due dates
Invoice amount and Taxes are automaticaly loaded from the cosen PO.
Debit Notes
A debit note is a document issued by a seller to a buyer to notify them of current debt obligations before an official invoice is sent. The debit note ‘makes note’ of the transaction for documentation purposes.
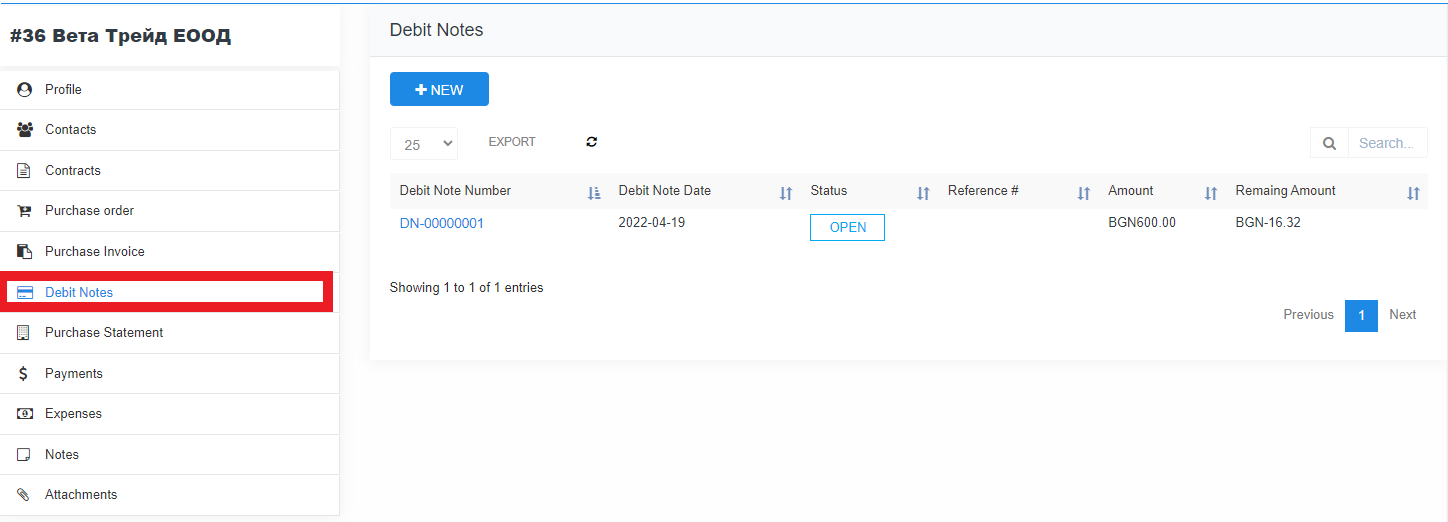
To see debit notes issued by certain vendor, go to Debit Notes menu from the side bar.
To manage existing Debit note Click on Debit Note Number in the list and go to dedicated Debit Note management module in Purchase.
To add new Debit note, click on +NEW button.
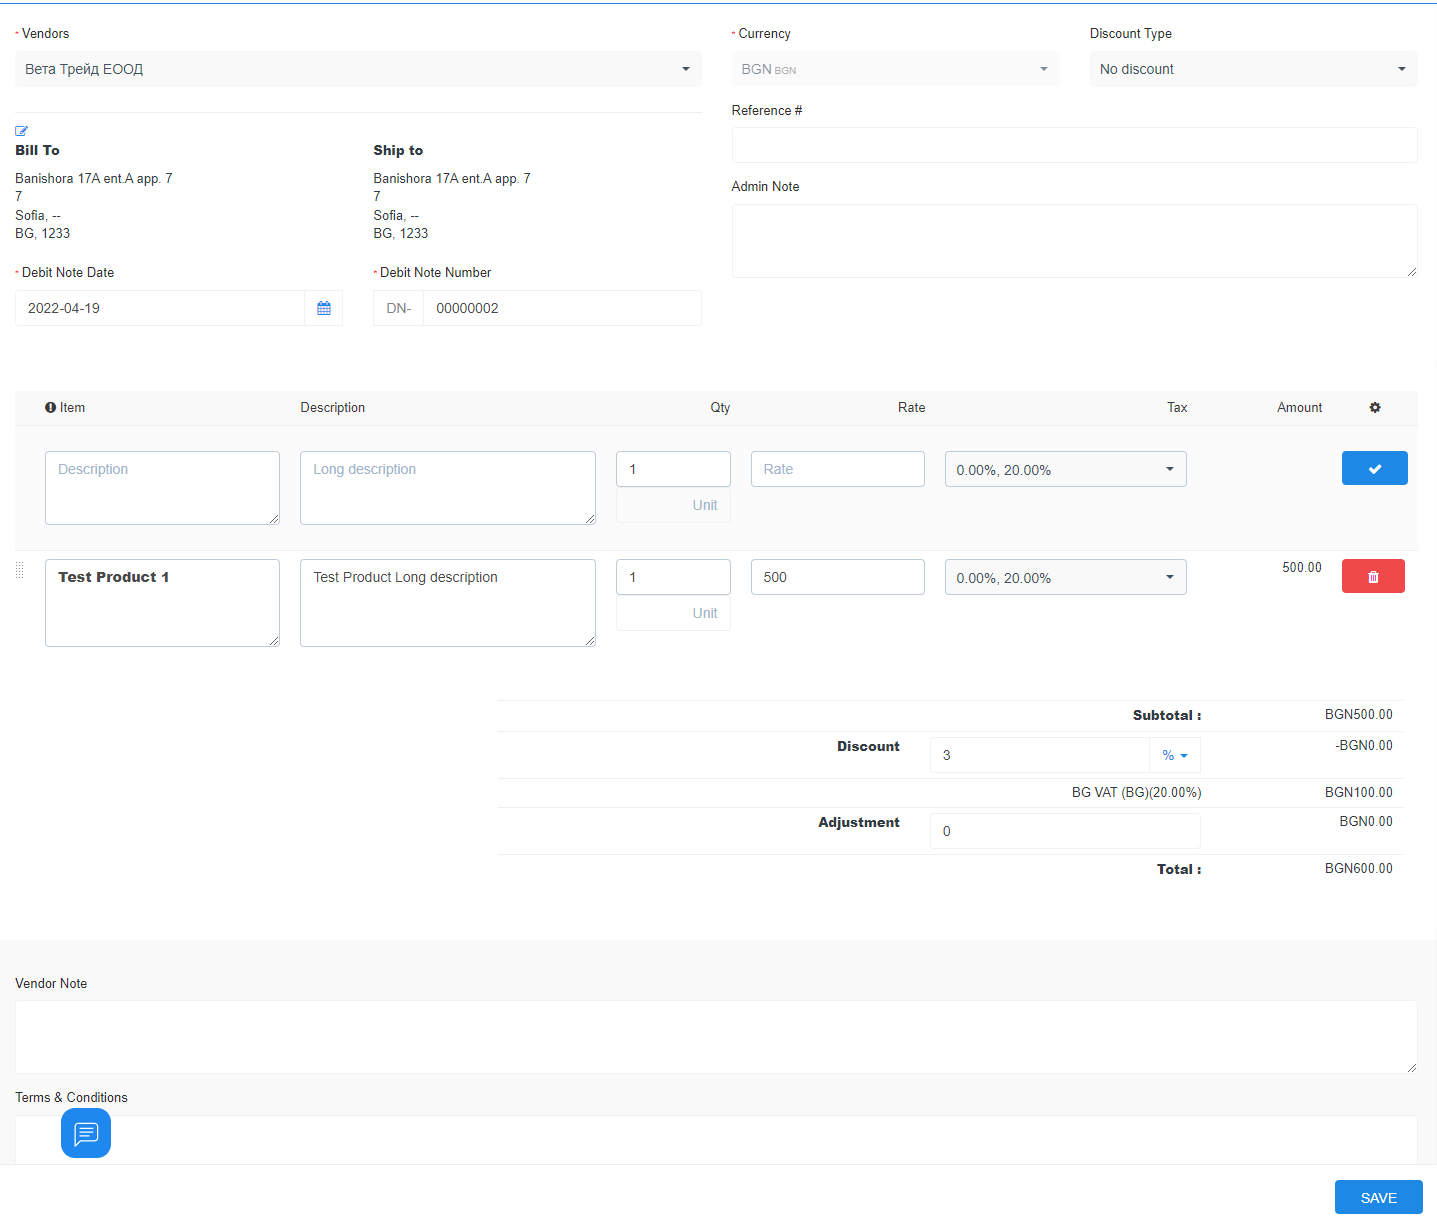
From Vendors dropdown menu choose the vendor issued the DN, Currency and Discount Type if any.
To add Billing/Shipping address, press the edit icon ![]() above Billing Addres section
above Billing Addres section
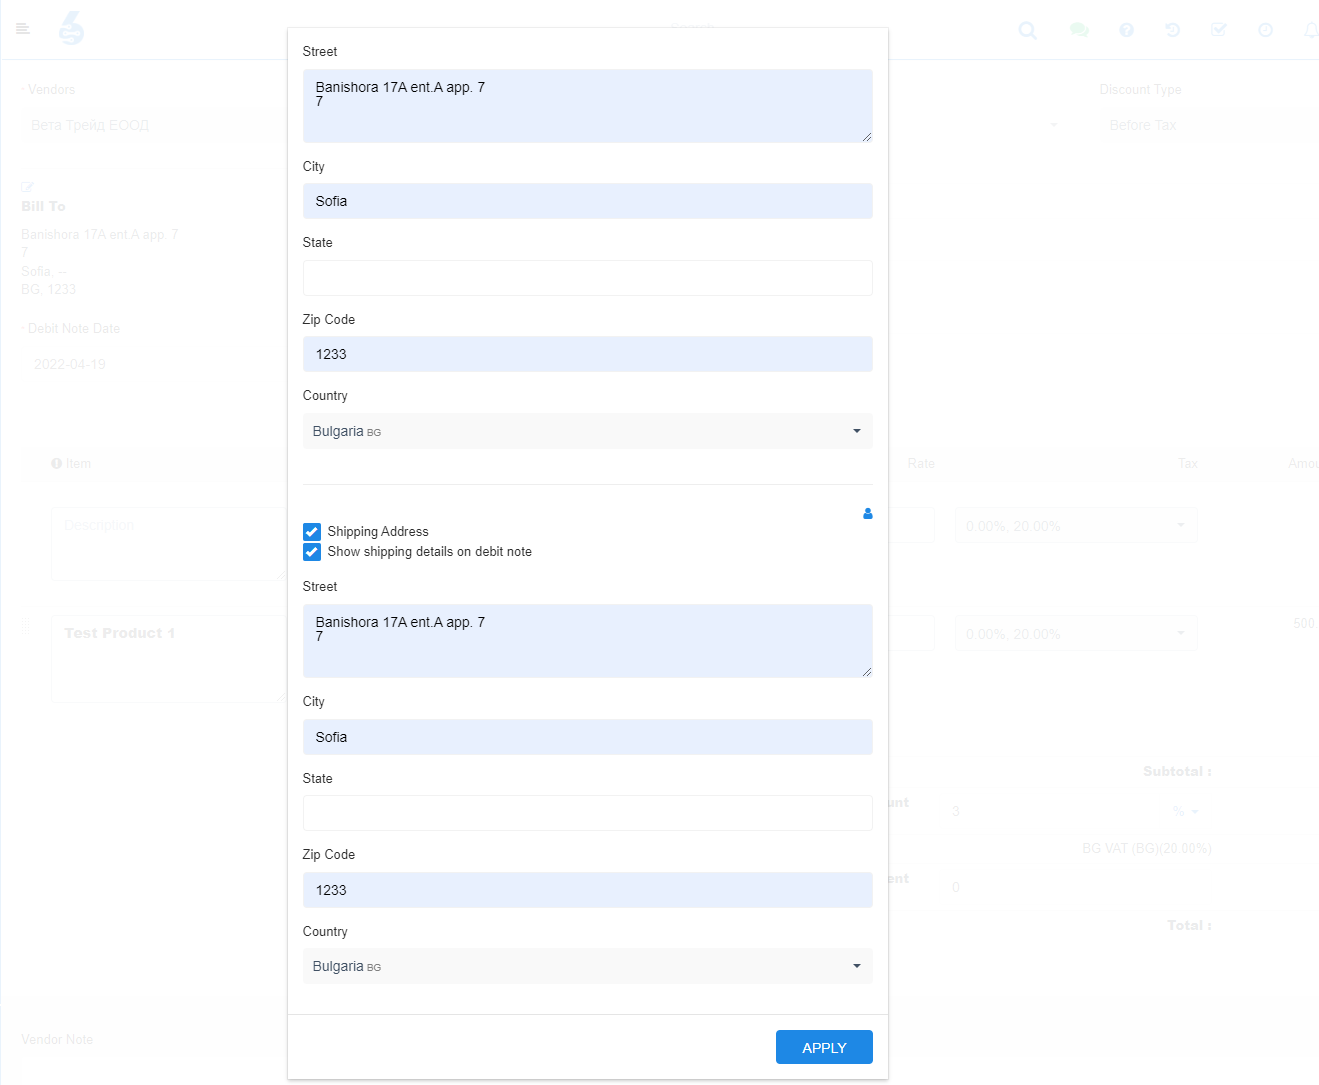 In the pop-up fill necessary rquisites and click Save.
Billing address is the address connected to the customer's payment method.
Shipping address is the address where order would be delivered.
Debit Note Date is the date when the note is issued.
In Items section the related to the DN products or services are described:

In Pricing cluster the available discount/adjustmnets and the final price are available:
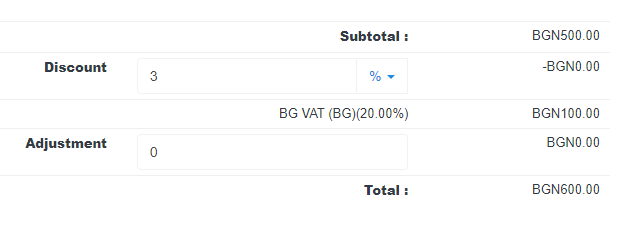
Save the the complete DN by clicking SAVE button

Purchase statement
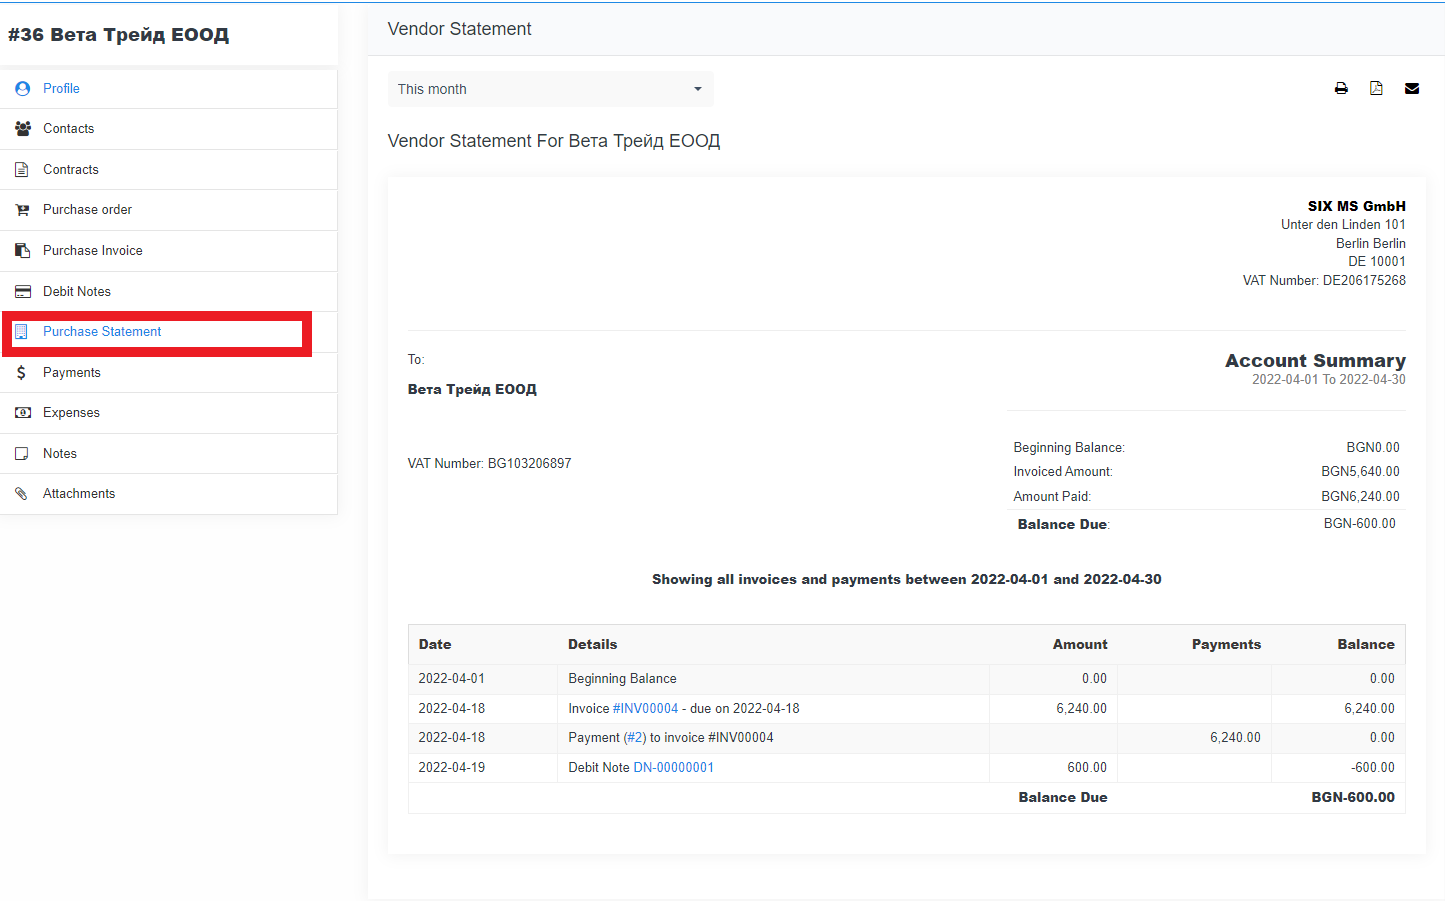
Screen generates a Vendor statement report - the document provides Account Summary - an overall information on relationship with the vendor for certain period:
Beginning Balance - Payment ballance at the beginning of the period
Invoiced ammount - sum of received for the period
Amount Paid - Amaount of payments provided for the period
Balance Due - Payment balance at the end of the period
and tracks the finacial documentation ( Debit Notes, Invoices, Payments).
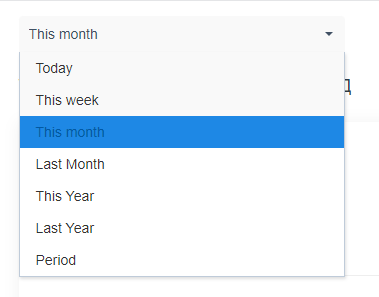
From Dropdown in the upper left corner of the screen choose desired period
Document generates automatically.
To print, save as PDF or send the document via mail, click on respective icon on the cluster in upper right corner ![]()
Payments
This section provides information for pending payments.

Click on Invoice to go to Invoices management module related to the Purchases
Expenses
To record expense related to certain vendor go to Expenses menu.

List with previosly recorded expenses is on the right. To see and edit an expense, click on Category name. A dedicated Expense management module is available in Financial module of the SIX
To Record a new expense click on RECORD EXPENSE button.
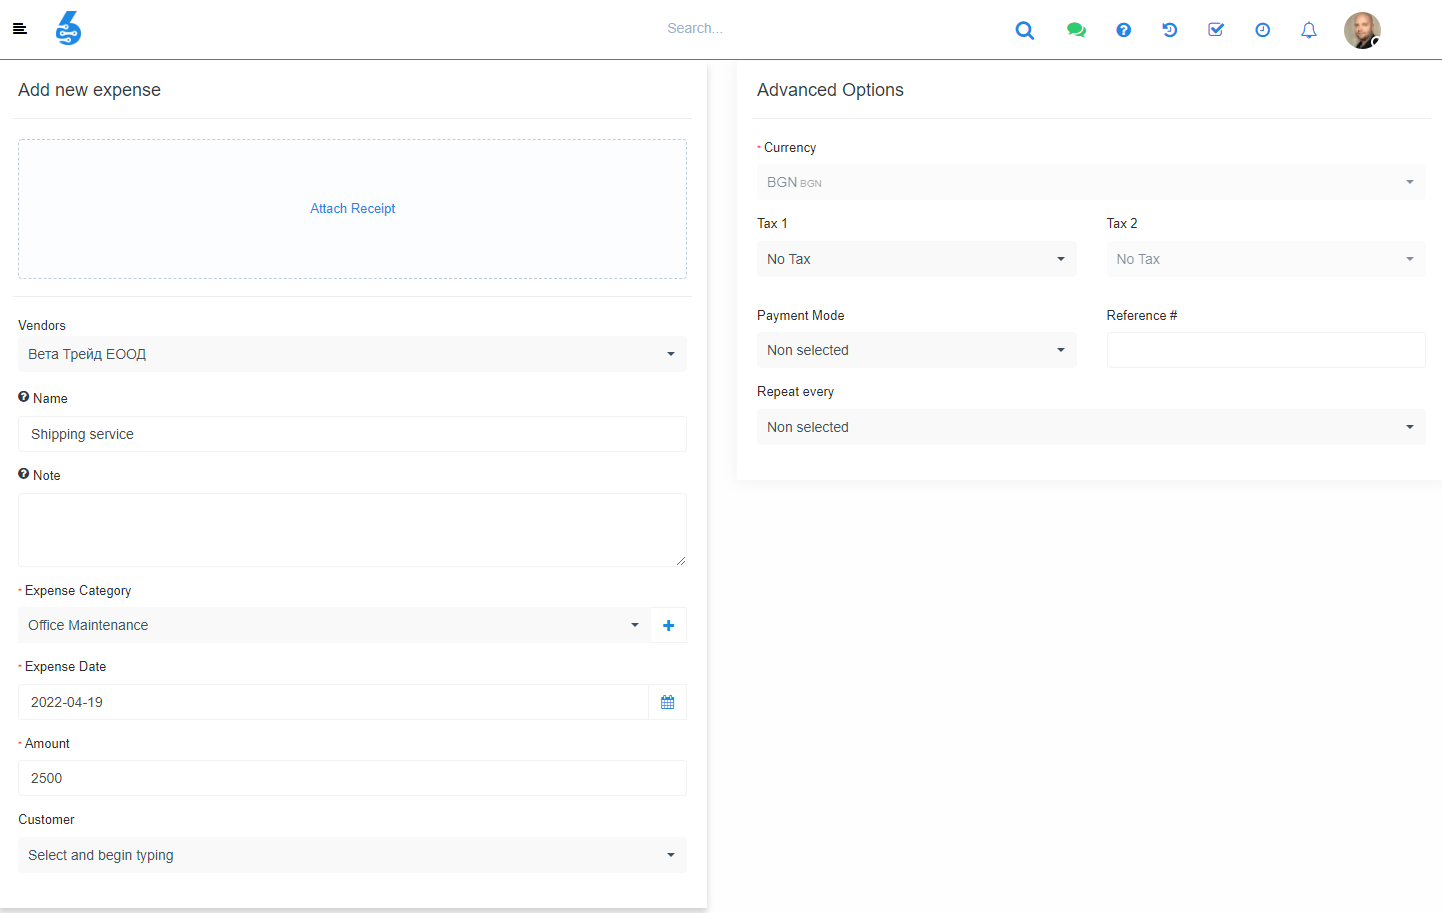
Attach Receipt by clicking on the field or drag and drop the file in it.
From Dropdown Vendors Choose Vendor's name.
In Name type a short description of the expense
From Expense Category menu choose existing category
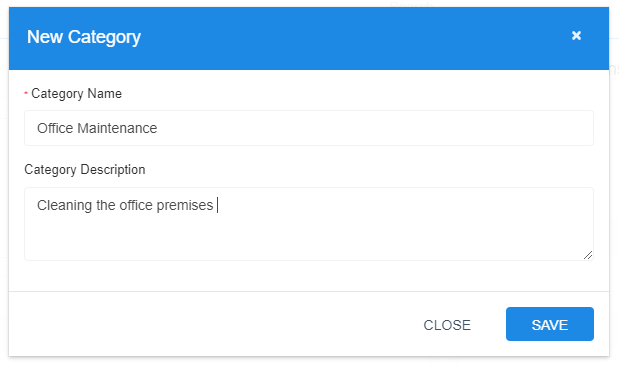
 or create a new one by clicking "+" button. In pop-up type the name of the new Expense category and short descrtiption of it. Clicl Save.
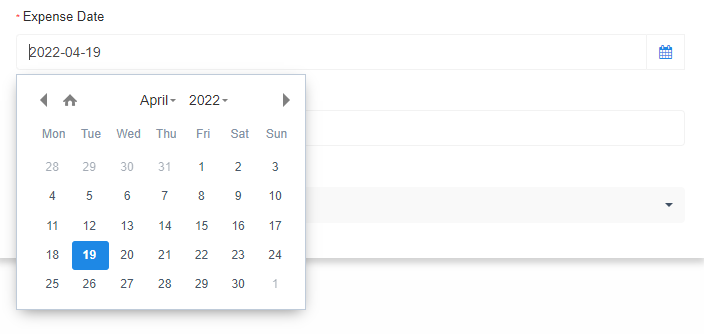
In Expense Date field chioose the respective date by clicking on Calendar or typing it manually:
In Amount field type the amount of the expense.
If the expense is related to certain customer, click on dropdown menu Cutomer. In the field start typing the name of existing customer:
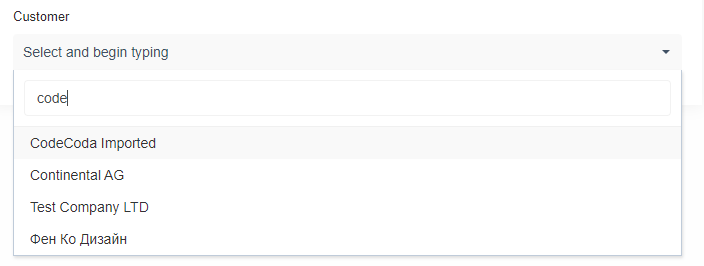
Select cutomer name from the list.
In Advanced options cluster choose additional expense options:
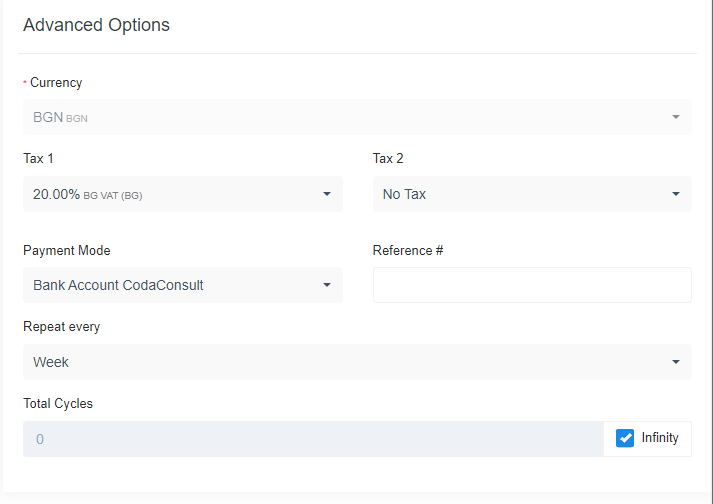
Currency, Taxation (if needed), Payment method.
If payment need to happen on regular basis, choose the terms:
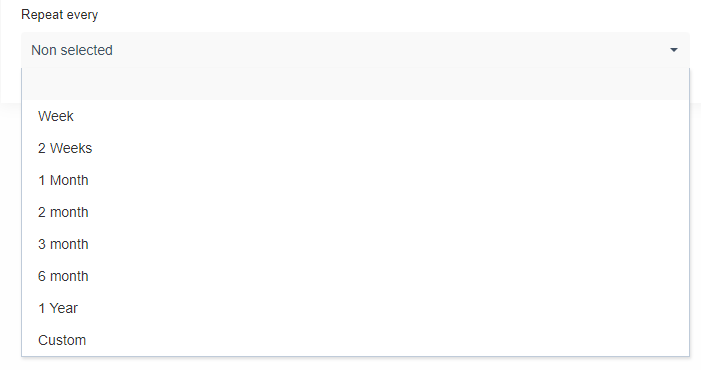
At the end Click Save to record the expense
Notes
Record Notes related to the Vendor by clicking on Notes menu in the side bar
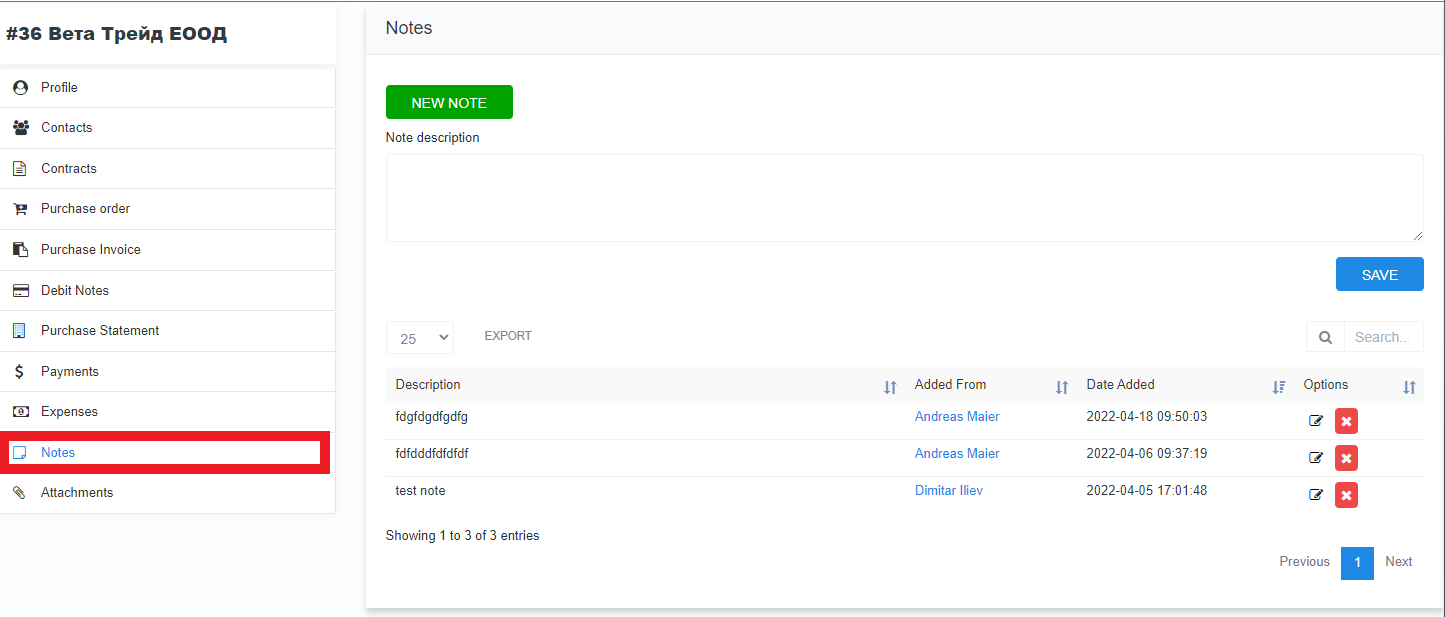
Click on New Note button. In the text input field type the note and then click Save
Attachments
To attac pictures or documents related to the certain vendor, go to Attachments menu in the Sidebar.
Attach file in two ways:
- by drag and drop the file in the grey field
- clicking on the field and choose the file from location folder.

To view a preview of the attached file, click on the green eye button at the left of it. To download the file, click on the name of the file.
The system allows import of bulk vendors list. To import vendors, go to Vendors module of SIX, and click Import vendors icon.
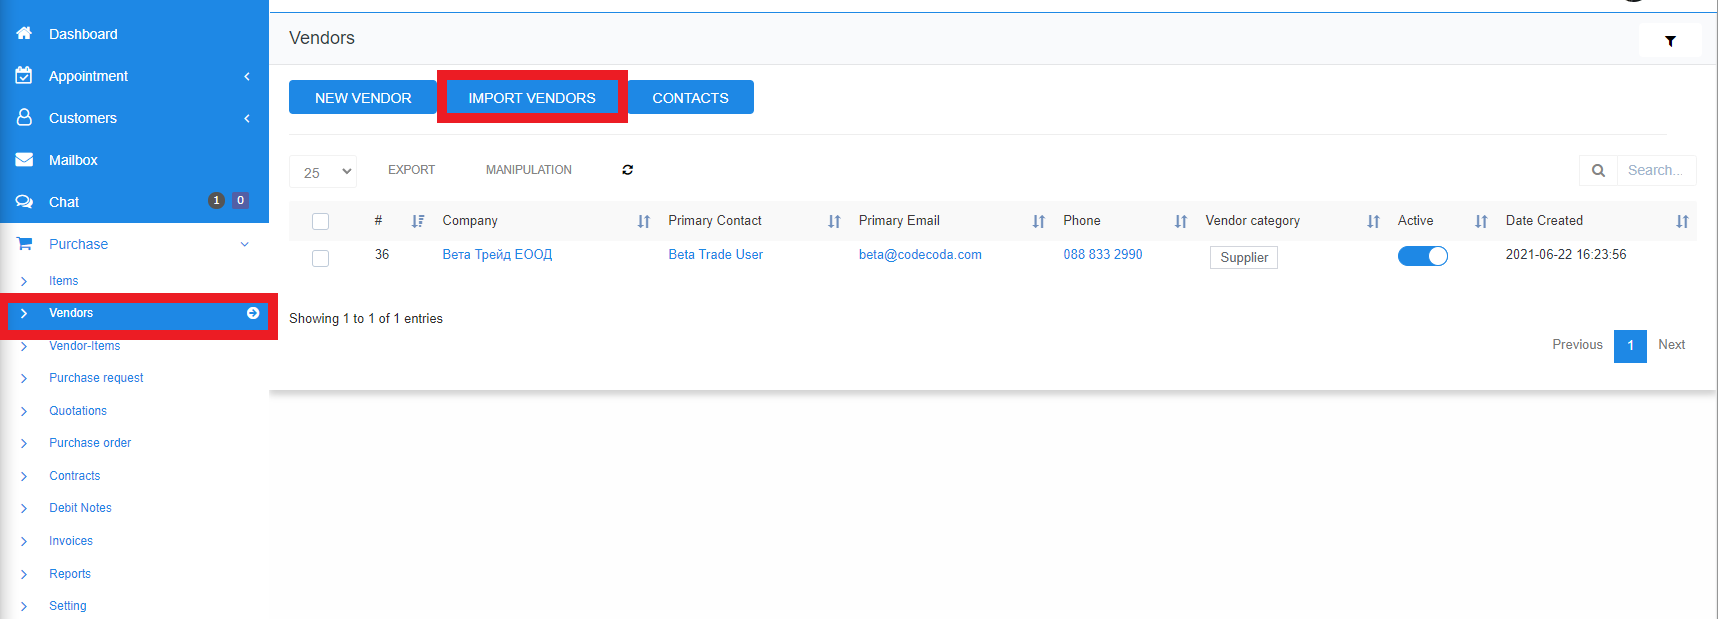 In order to import vendors in SIX, the list with Vendors should be prepared in certain way.
List need to be in excel format with specific number and order of columns.

Download a Sample Vendor Import File
To download sample file for Vendors import, click on Download sample button:
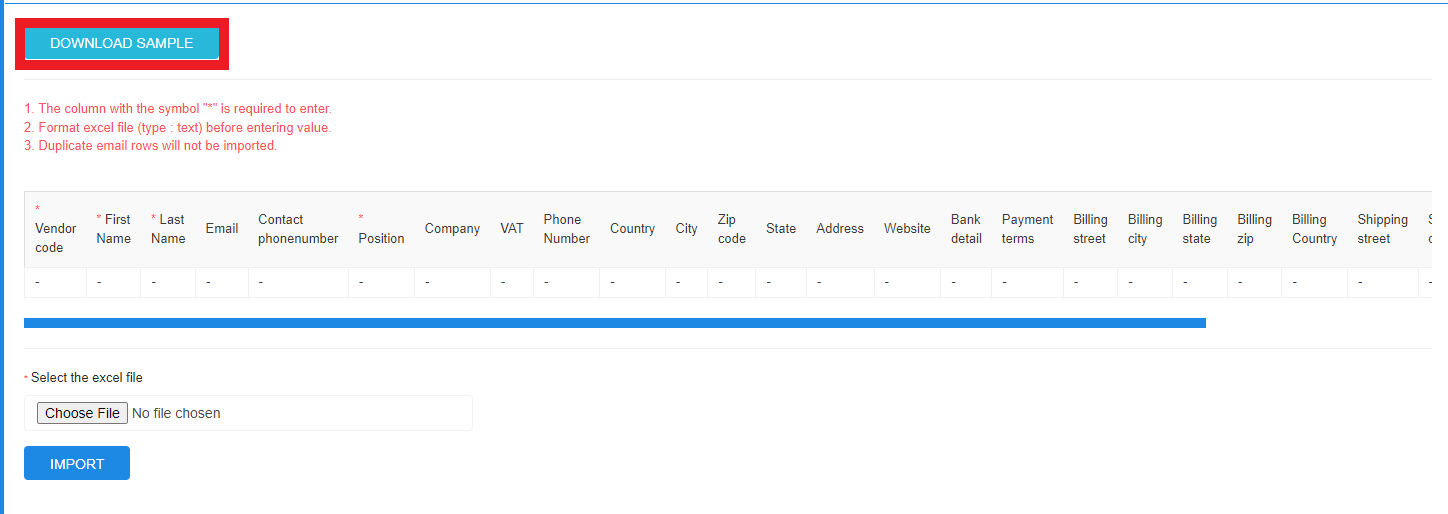
Save the file on convenient place.
Preparing the Vendor Import File
To prepare the vendor import file, List with vendors need to be mapped in downloaded excel file. Following conditions need to be implemented:
- The column with the symbol "*" is required to enter.
- Format excel file (type : text) before entering value.
- Duplicate email rows will not be imported.
Importing Vendors from Excell
Once prepared, upload the xls file by clicking Choose file button

Once uploaded, click on Import button
What are Purchase Requests (PR)
Setting up Purchase Request Pipelines
For purchase requests to properly adapt to your companies requirements you will have to set up the appropriate approval procedures in Purchase → Settings → Approval.
Creating a new Purchase Request
To create a new Purchase Request click the "New" Button on top of the Purchase Request List. This action will take you to the "New Purchase Request" Data Screen.

Purchase Requests Statuses
Depending on your Purchase Request Approval Process Setup, you will have two statuses which Purchase Requests can reside in:
- Approved
- Not Approved
In case you do not set up a proper approval process, your PRs are automatically approved.
Downloading Supporting PR documents
Once Purchase Requests are approved, you may download respective documents of prove.
Adding a new Purchase Request
To add new PR, go to Purchase request module in SIX, and click NEW button
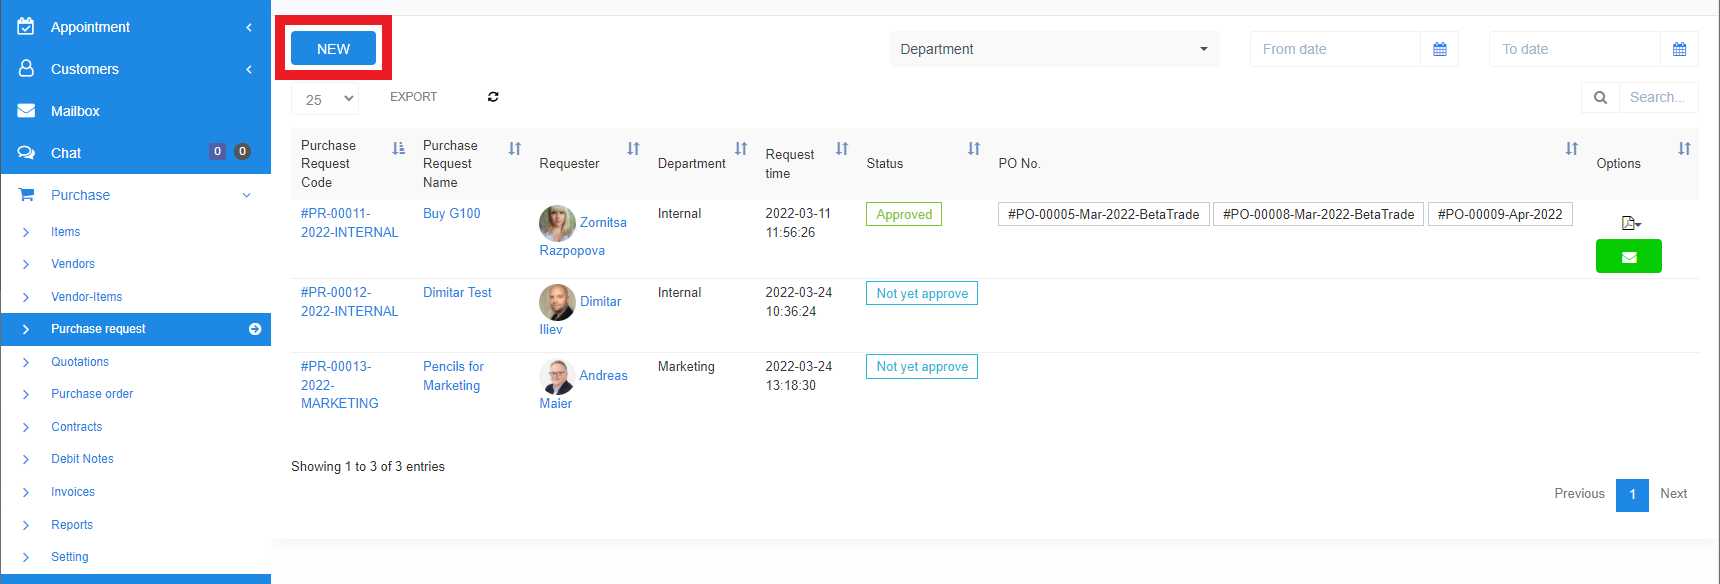
In Add new Purchase request data screen add necessary requisits:
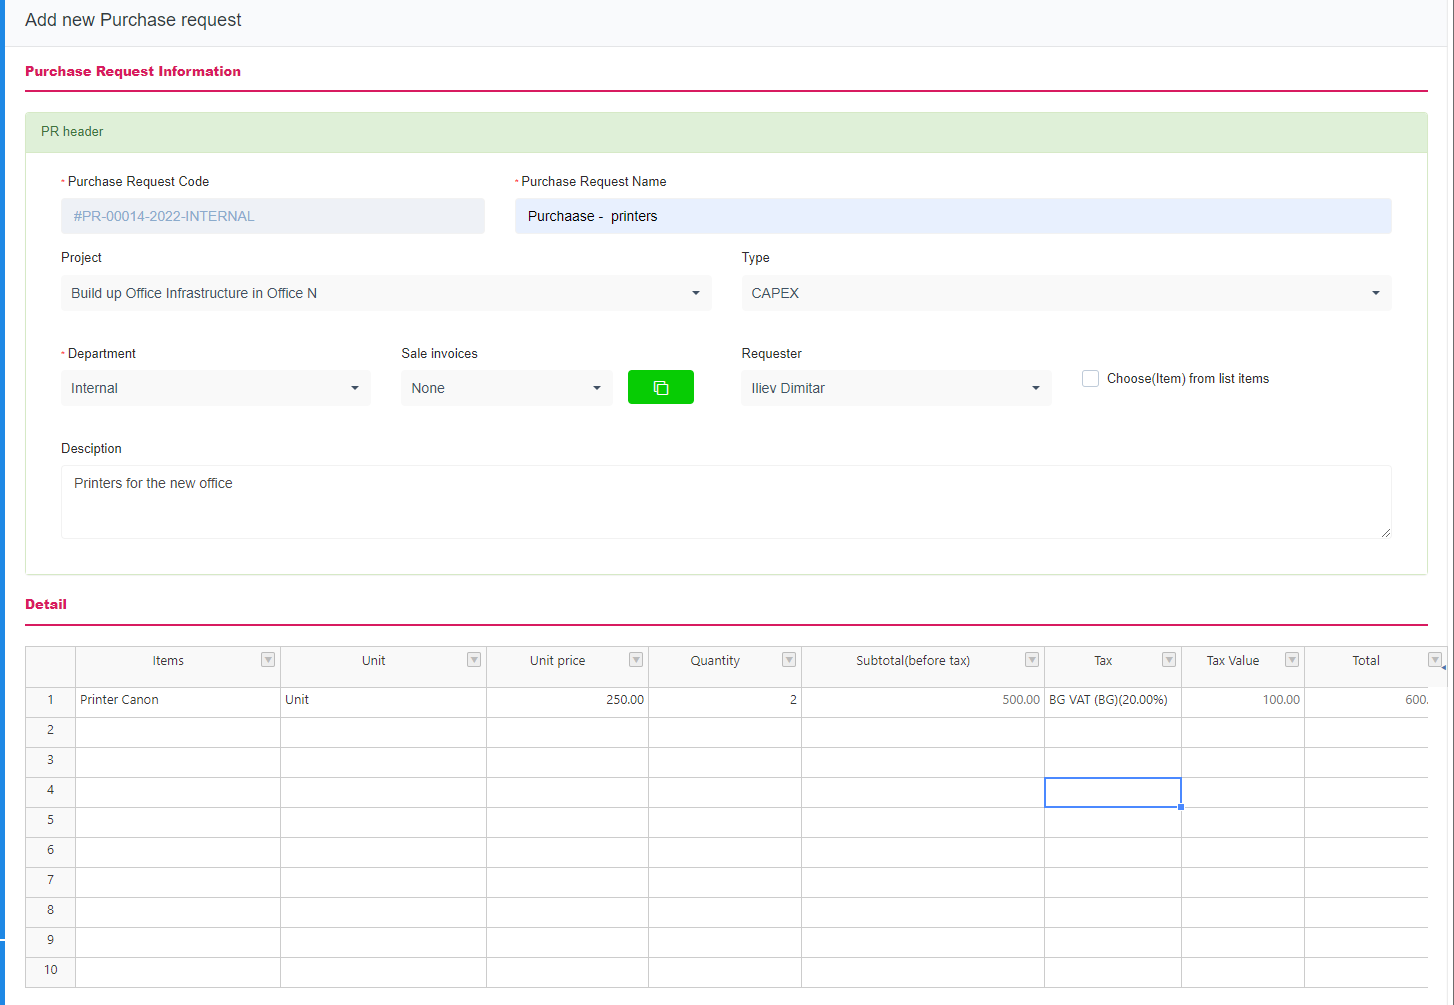
Purchase Request Code - Automaticaly generated by the system
Purchase request name - type Short description of PR purpose
Project - if PR is related to particular project, select it from the drop-down
Type - choose from the drop-down if expenditure will be Capital or Operational
Department - select from the drop-down to which department PR belongs to
If PR is related to particular sale invoice, choose it from the dropdown. To copy invoiced items in the PR table, click on the green button "Copy sale invoice" ![]()
Choose requester of the PR from the dropdown menu Requester
If the requested items are availabe in company items list, mark the checkbox "Choose(Item) from list items". This will allow you to choose options directly from the list.
Detail table is a list with items included in the purchase request.
Add an item by double click on Items cell in the table:

If the box Choose(Item) from list items is not checked, a free text can be added in the cell.
In Unit column double click on cell. From the dropdown choose the measurement unit in which the item would be purchased:
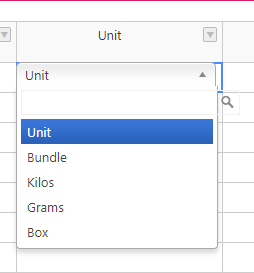
in Unit Price column type the price for one unit from the item.
in Quantity column specify how many units from the item you want to purchase
In Tax Column choose the Tax that should be applied to the purchased item:
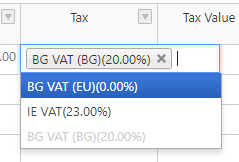
More than one taxes can be added.
Based on the information in the table, the system will automatically calculate the end price. It is displayed at the end of the page:

Click SAVE to accomplish the PR
Managing Vendor Quotations
Quotations are a substantial part of the Purchase Management or Procurement Process of products. Quotations are a sub-process of Purchase Requests, and if appropriately connected, allow the direct screening of financial offers.
Quatation is a document, provided by Vendor and related to particular previously sent Purchase request. It describes the availability and price of requested items. The document is coming from external source and have to be manually entered into the system.
To see available quotations, go to Purchase->Quotations screen:
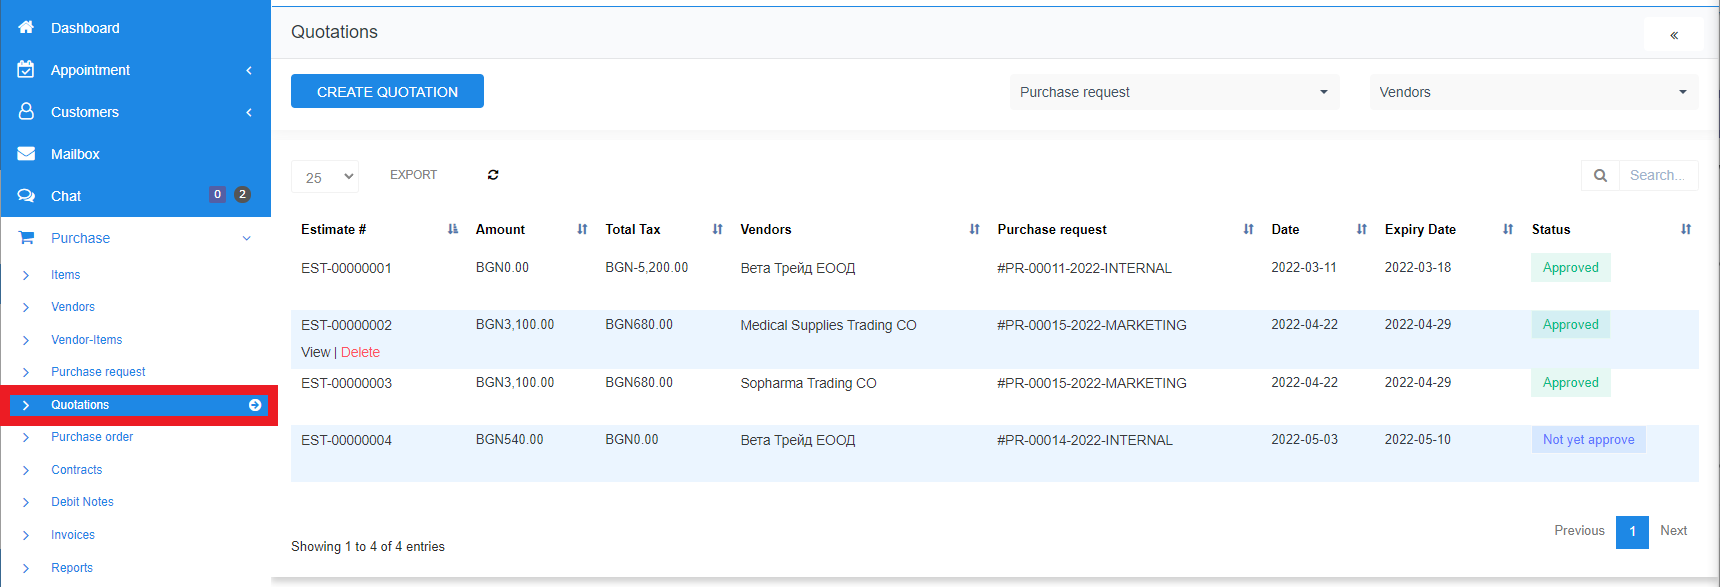
After every Purchase Request sent to a Vendor or Supplier you want to compare individual financial offers. On product based offerings you can do so line by line. Therefore each incoming quotation needs to enter SIX as data-sets.
To create a new quotation, go to Purchase->Quotations screen, and click Create Quotation button:
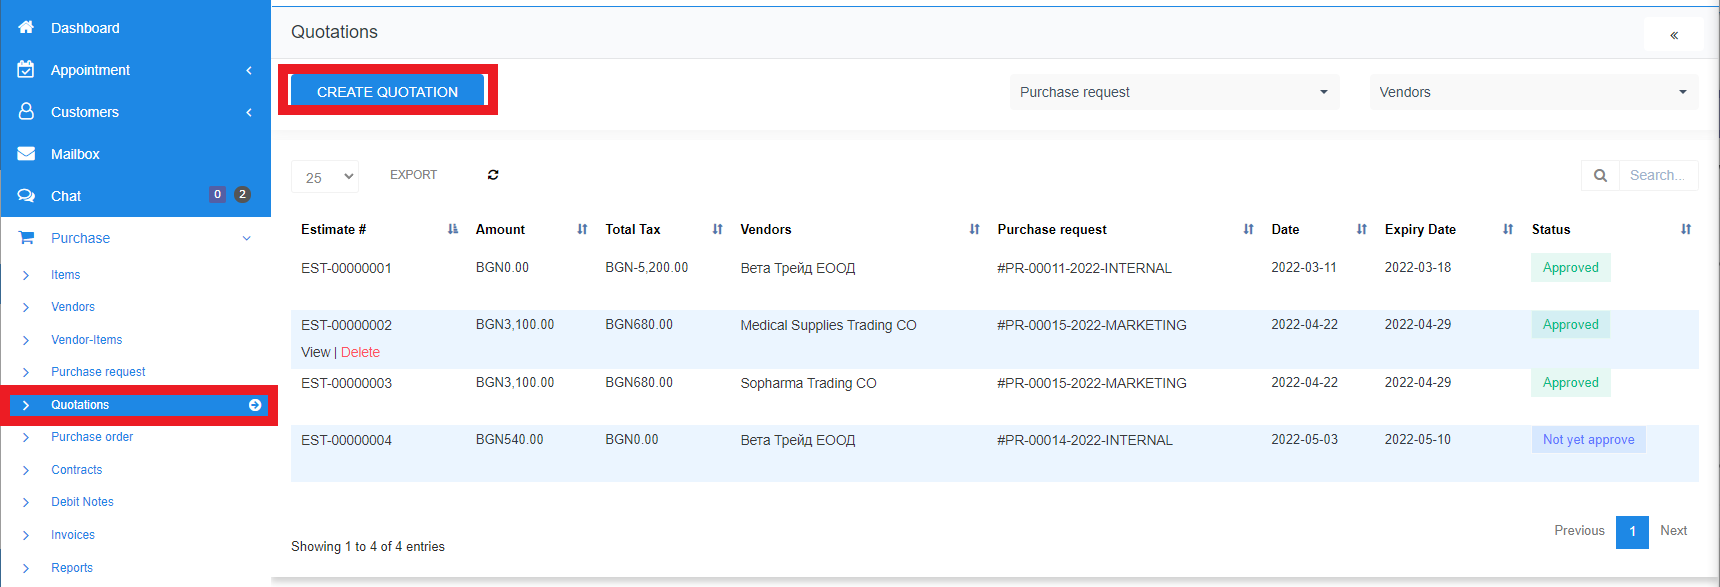
In Create New Estimate data screen, fill in the requisites for the new Quotation:
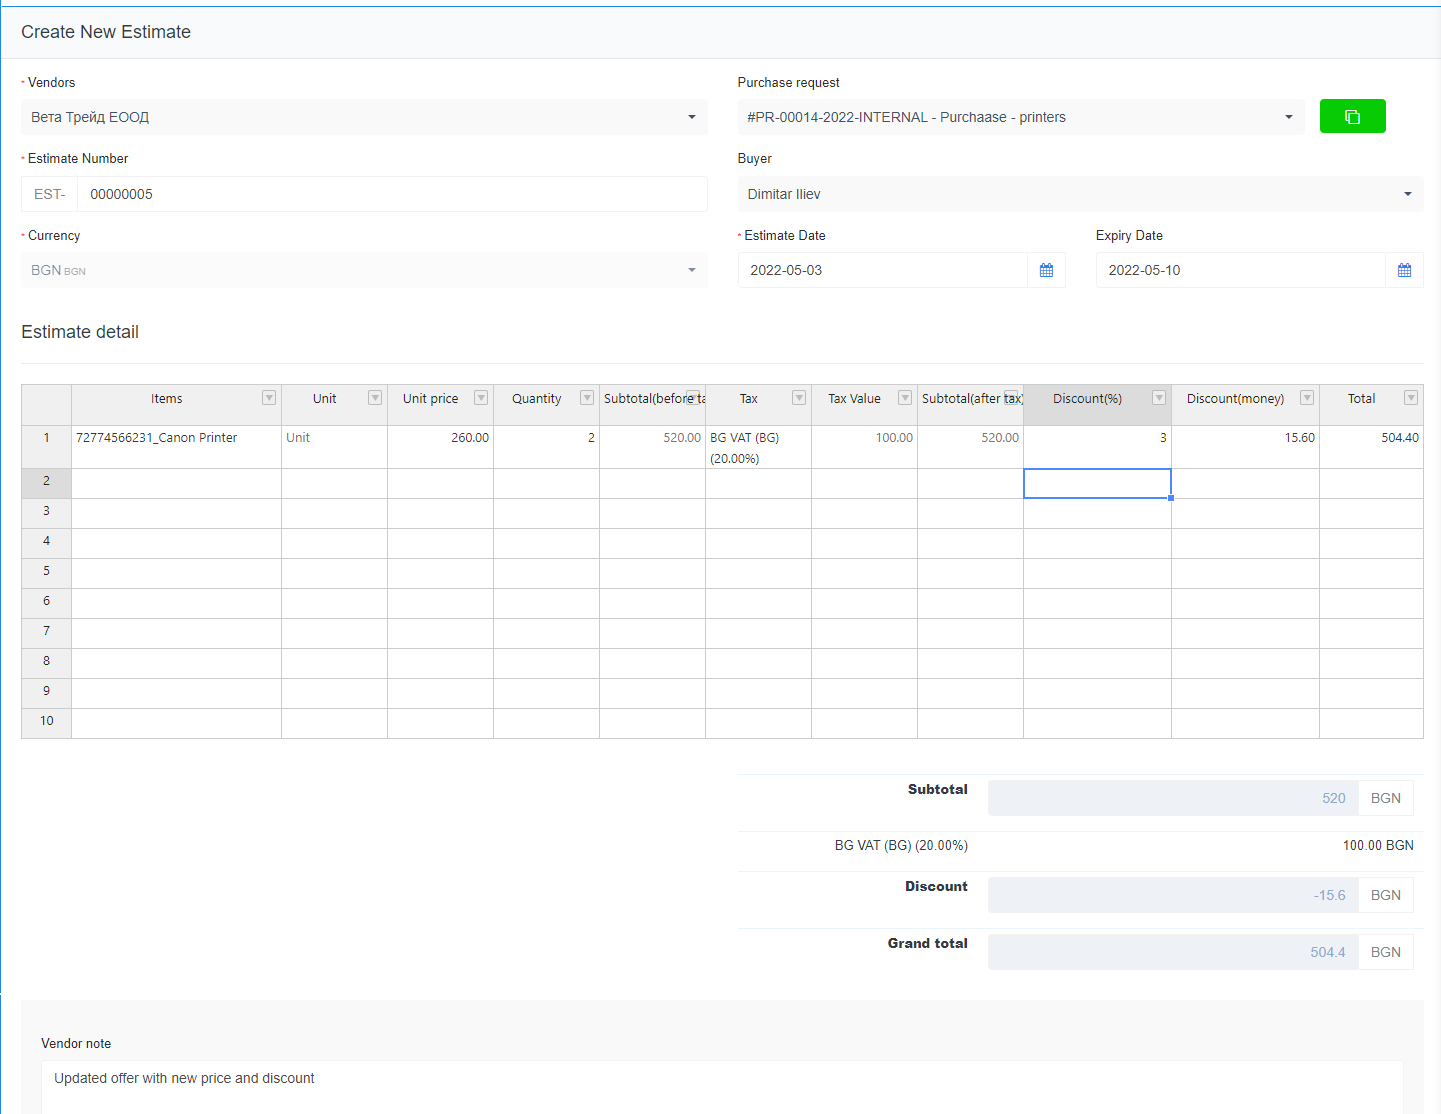
Madatory Fields
Vendors - choose the Supplier/issuer of the quotation from dropdown
Estimate number - internal number, automatically generated by the system
Currency - currency used in the quotation
Other fields:
Purchase request - if quotation is related to particular PR, choose it from the dropdown. Press ![]() button to import the PR data in the quotation.
button to import the PR data in the quotation.
Byuer - from dropdown select staff member who is purchasing the items
Estimate and Expiry date - select the terms of the offer.
Edit Estimate detail if needed
Edit an item by double click on Items cell in the table:

In Unit column double click on cell. From the dropdown choose the measurement unit in which the item would be purchased:

in Unit Price column type the price for one unit from the item.
in Quantity column specify how many units from the item you want to purchase
In Tax Column choose the Tax that should be applied to the purchased item:

More than one taxes can be added.
Based on the information in the table, the system will automatically calculate the end price. It is displayed at the end of the page:
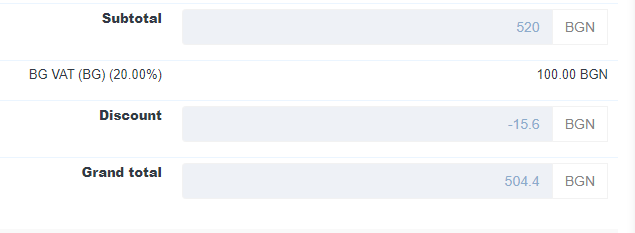
Click SAVE to accomplish the Quote
Screening of Quotations
In a list with available quotations click on the name of chosen one to see the detailled information:
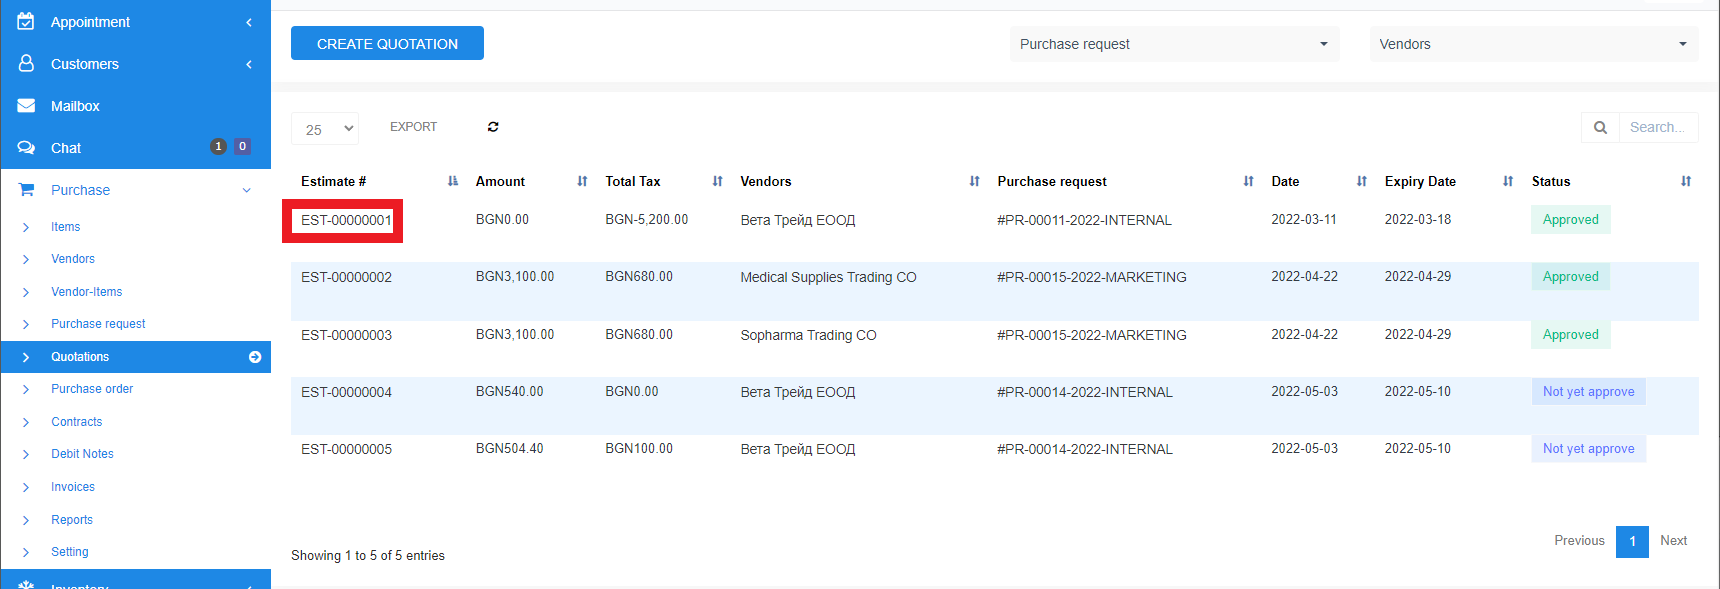
Detailed information is displayed in a modal at the right side of the screen:
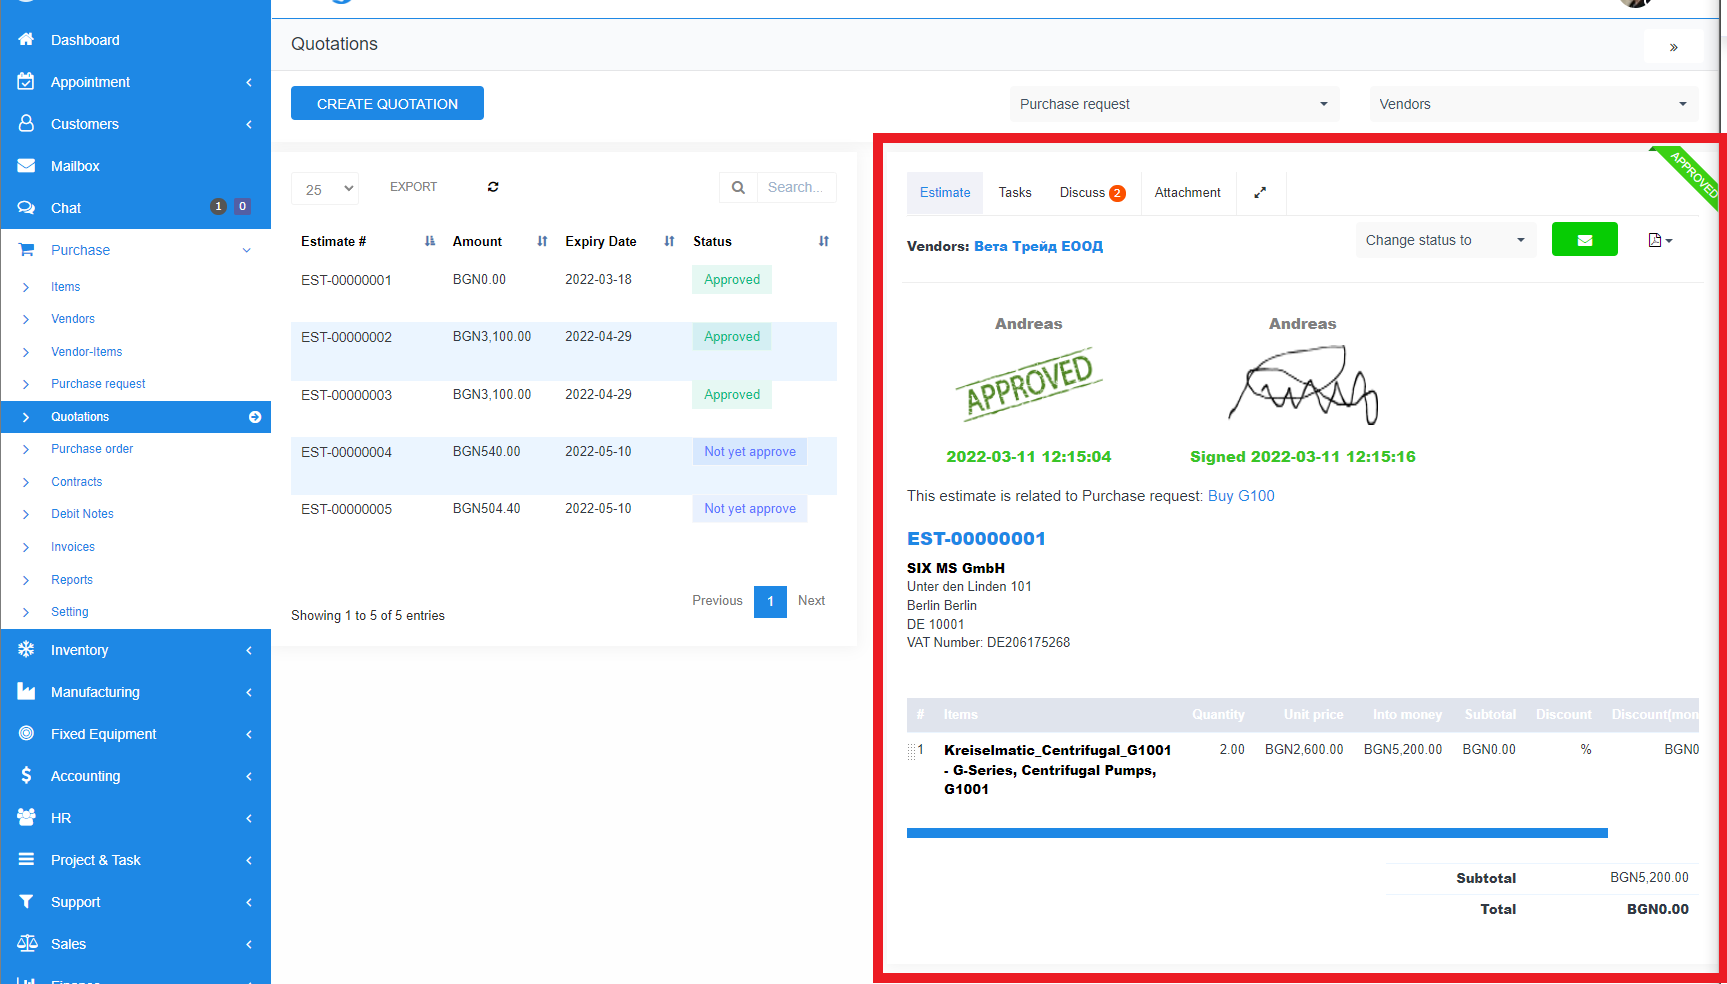
At the top right corner is displayed tha status of the Quotation - Not Approved, Approved. Approved quotations are ready to be transferred to Purchase Order via PR.
Approvers' signatures are displayed below, along with date and time of approval.
To change the status of selected quote, click on Chage status to dropdown. Available stauses are Approved, Not yet Approved, Rejected
To send the quote via e-mail, click on envelope icon ![]()
In the pop up choose the recepients. In send To field start typing the e-mail address and choose then from the dropdown
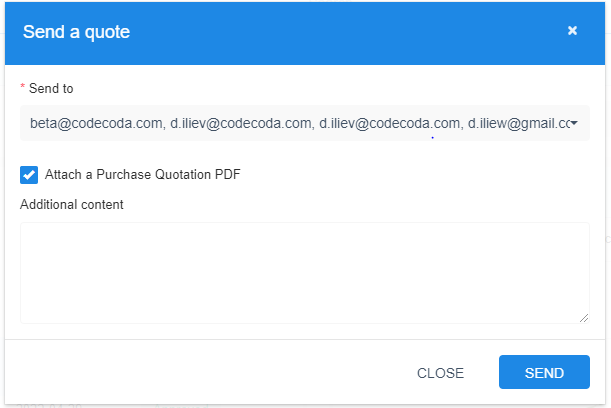
Checkbox "Attach a purchase Quotation PDF" if checked attaches the quote in PDF format to the mail.
To see related to the Quote Purchase request click on PR name:

To edit the Quote, click on Quote #
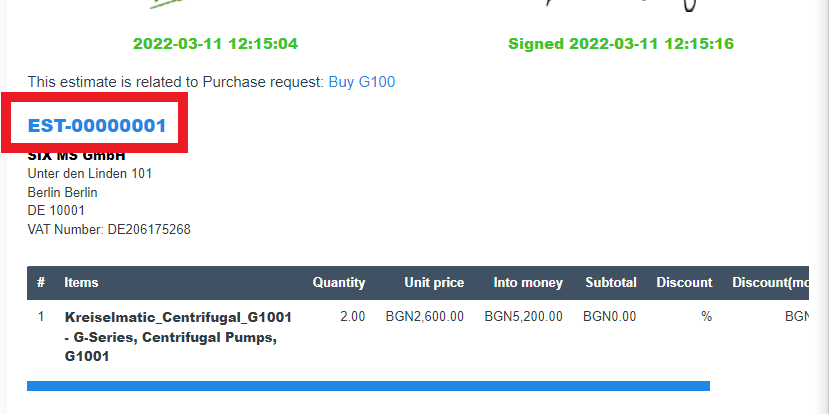
To add or view tasks related to the Quote, clicl on Tasks tab:
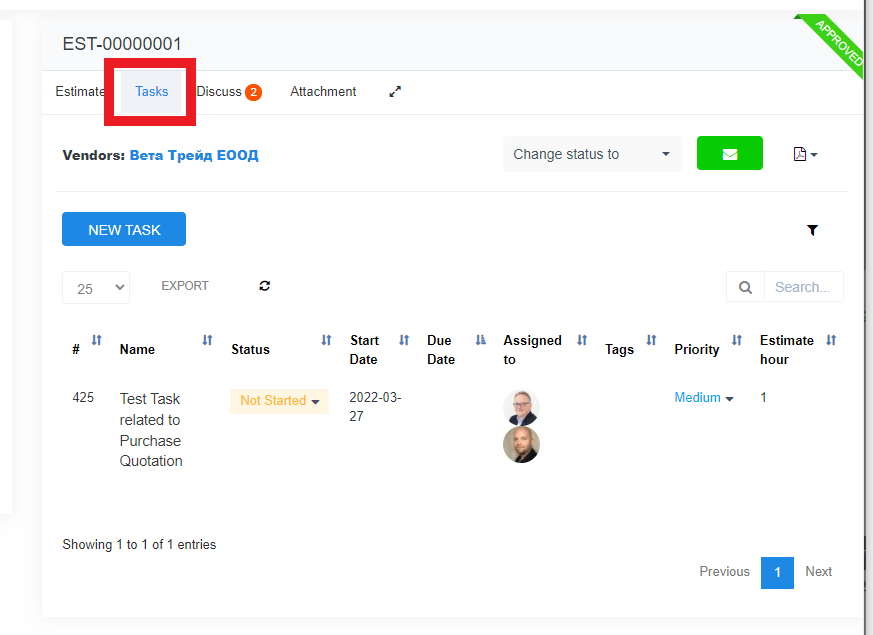
To Create a new task, click on NEW TASK button
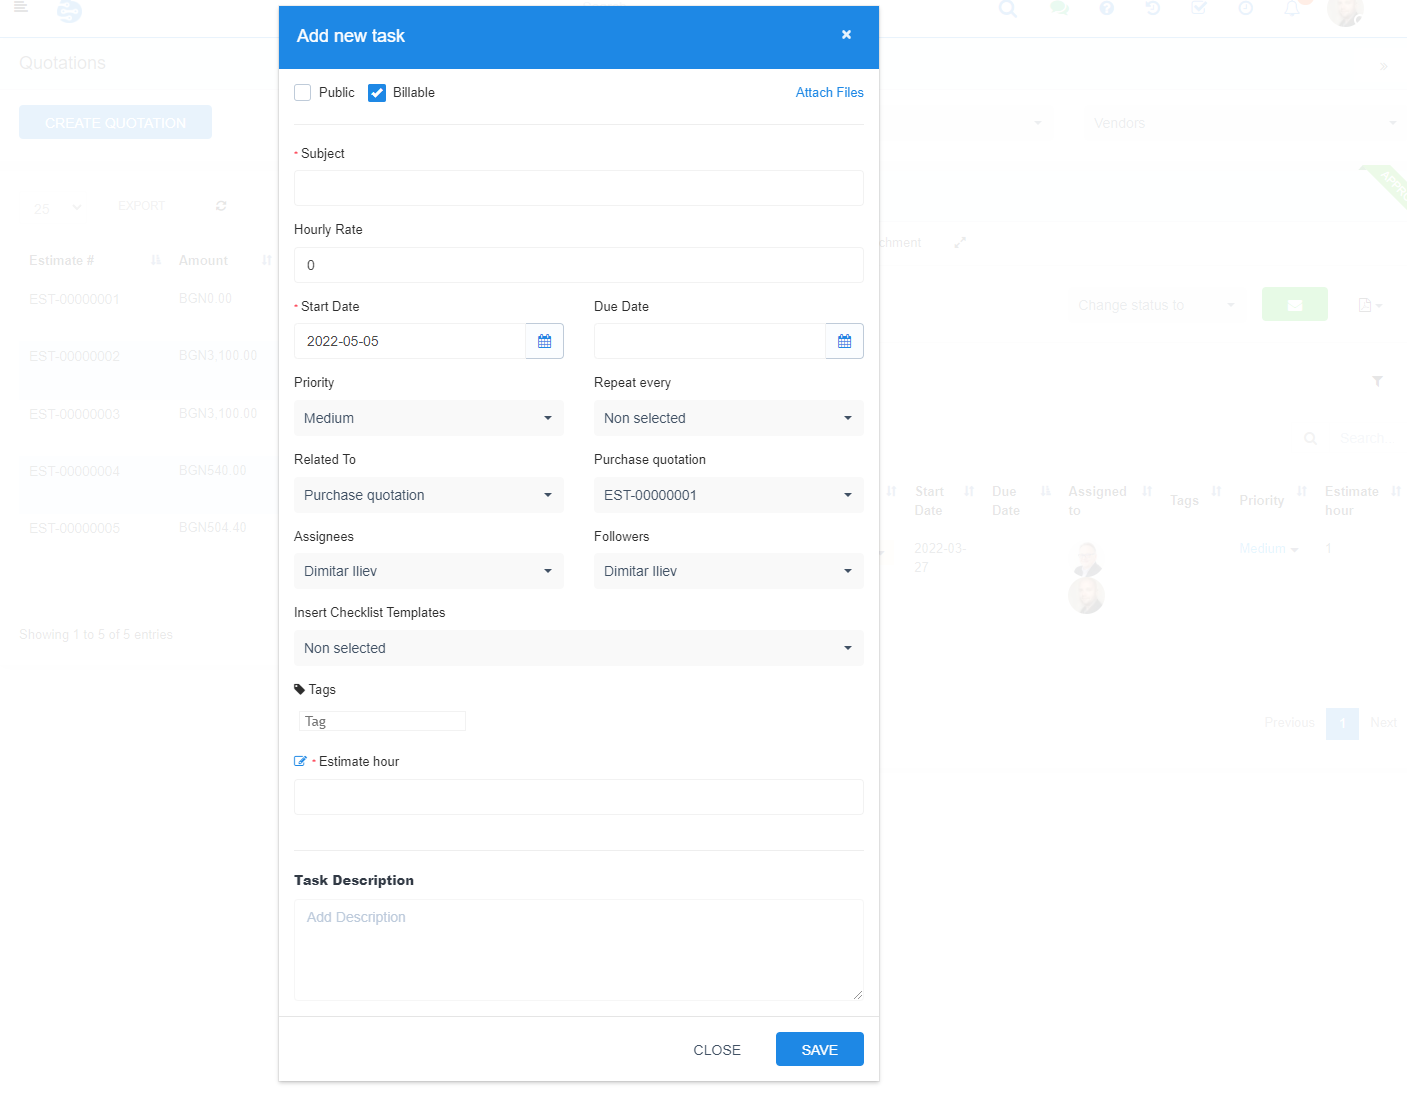
Required information for task creation:
- Subject - or an appropriate name for the task.
- Start Date - when the processing of the task should be commenced.
- Task Description - an appropriate task description, which allows task execution for the Assignee(s).
When creating tasks from within a Quote, the task will be automatically associated with the Quote and you will be able to choose addition - Quote -related data - such as milestones eg.
You can create discussions topic related to the Quote. To create new one, click on Discuss tab:
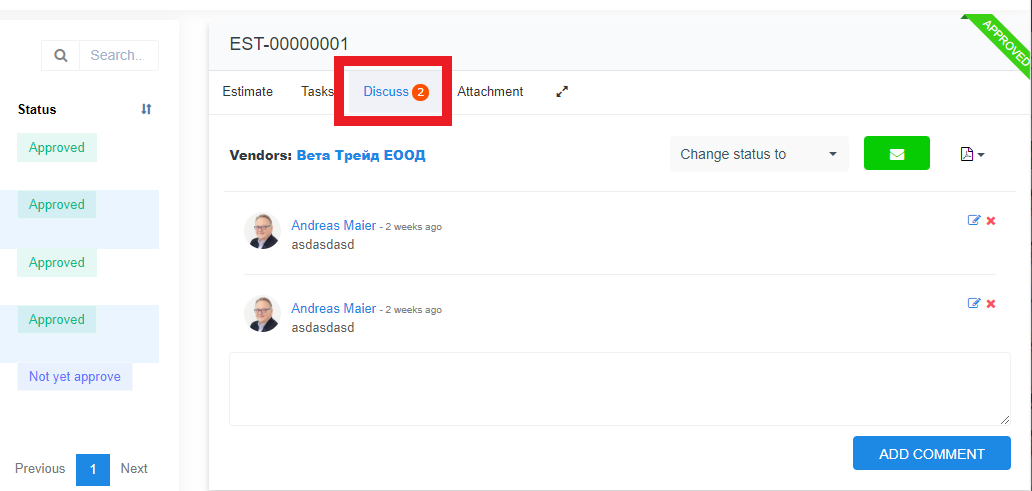
Type the message to staff assigned to the Quote in the text input field and click ADD COMMENT button
To delete or modify previous messages, click on respective edit and delete buttons next to every discussion thread. ![]()
To attach a document to the quote, go to Attachment tab:
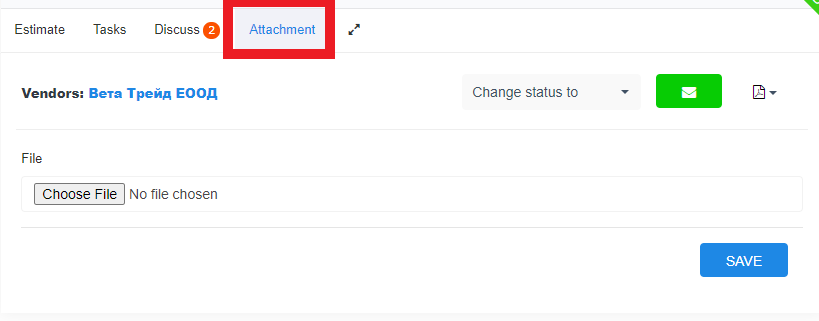
Click on Choose file button. In dialog window pick up the file and hit Open
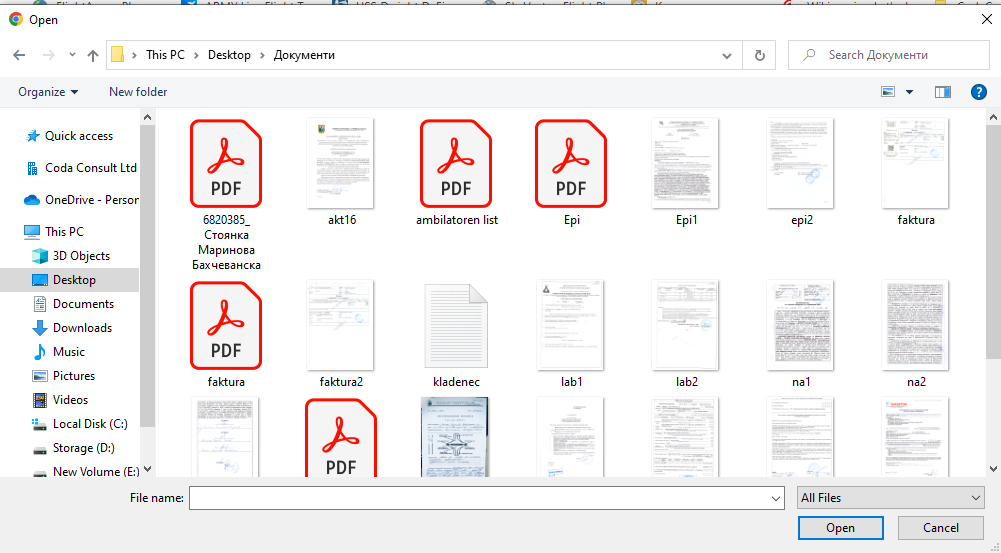
Thenk click on SAVE
Management of purchase orders in SIX is is carried out through Purchase Order menu in the side bar.
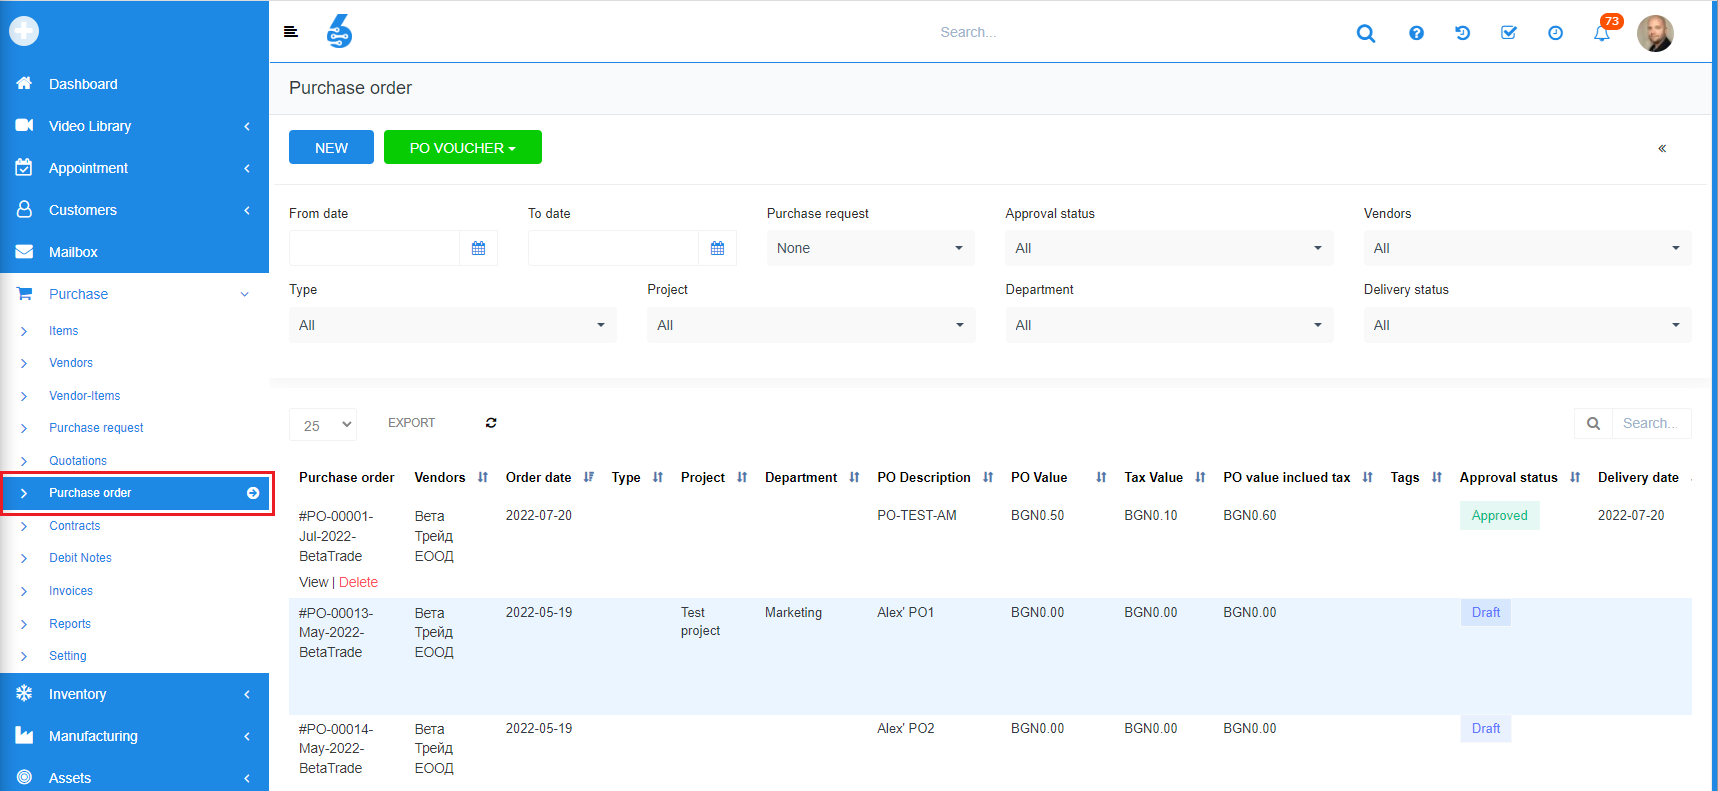
All available POs are groupped in a list. you can filter them by date, Purchase request, Approval status, Vendor, Type, Project Department and Delivery status, applying the filters above the list. You can use them separately or simultaneously.
Using PO VOUCHER button, you can generate PDF with your POs, do download ot print it.
To view a Purchase Order details, click on PO name or View-button. Details of PO are displayed in the right side of the screen
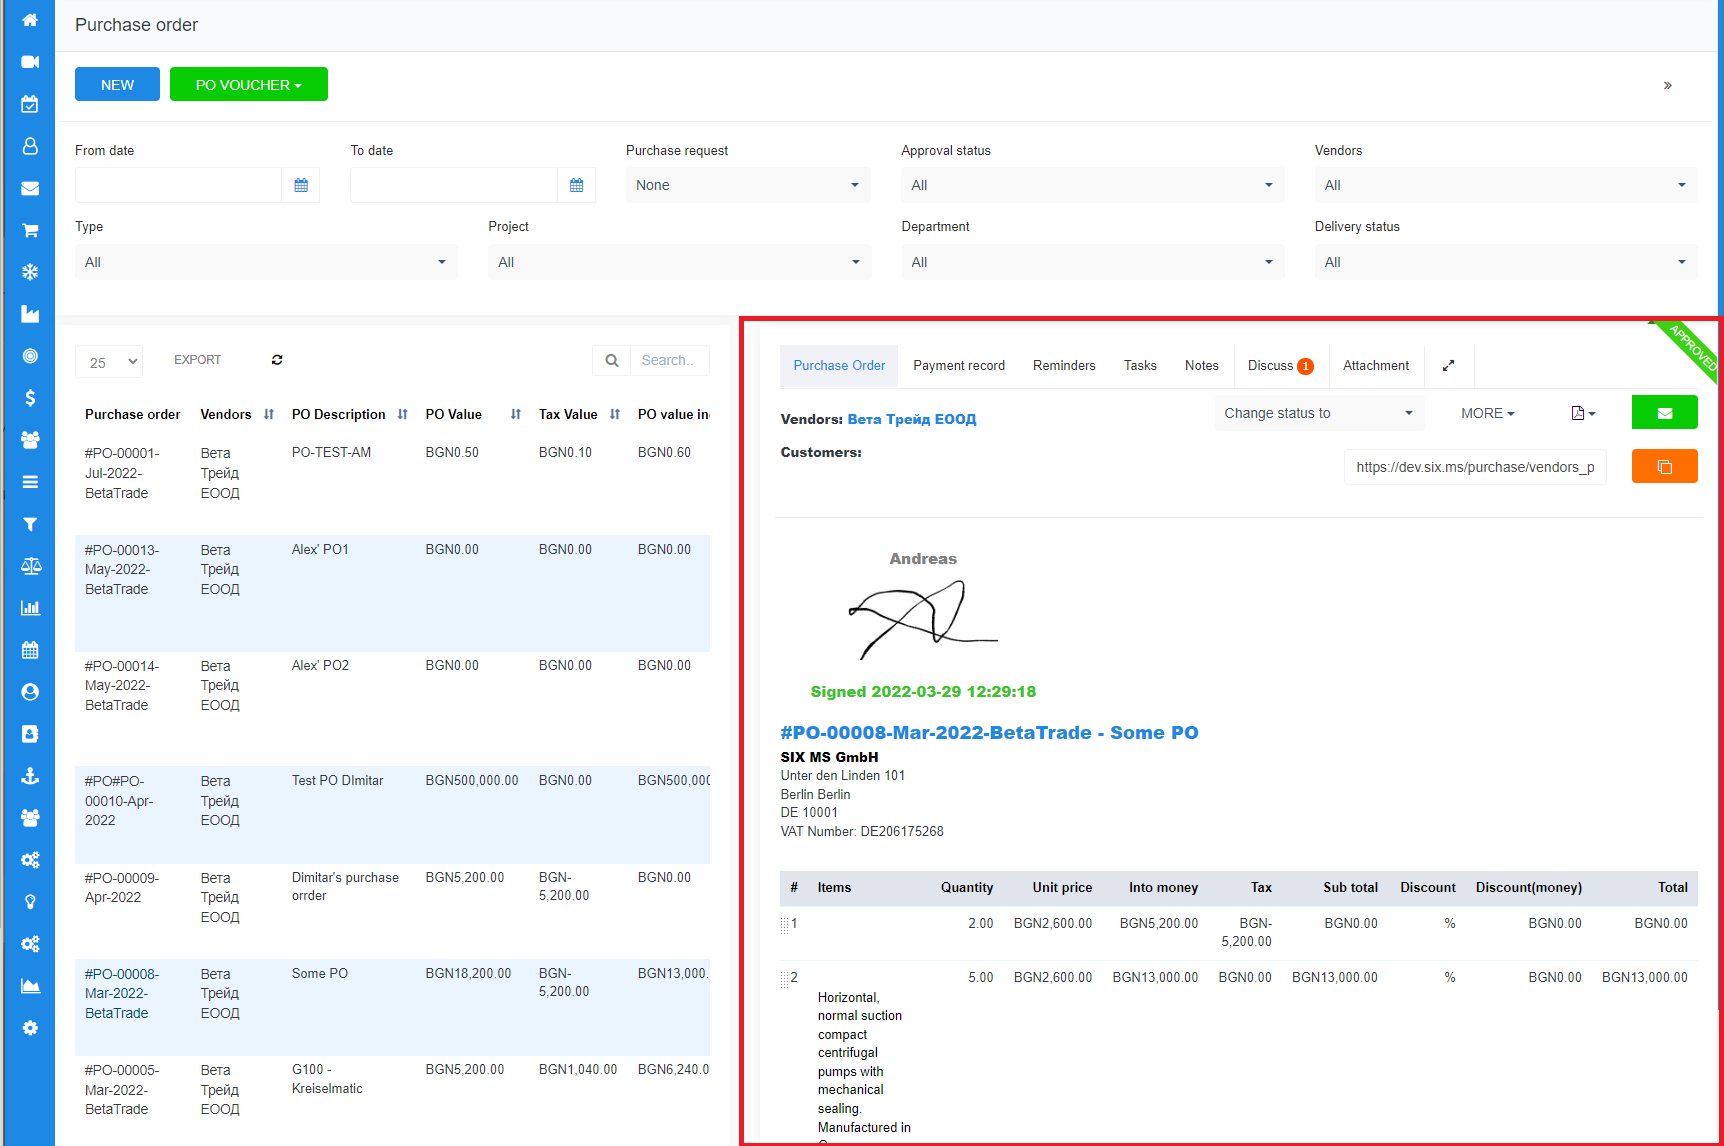
In Purchase Order tab you can check variuos details for the PO
- Status of the PO - in the upper right corner there is a badge, displaying the status of the PO -

- If the PO is approved, a signature of approver is displayed.
- Items that PO contains
- Financial data and status of the PO
Statuses can be changed via dropdown

From More dwopdown the mode of the PO can be changed or PO to be edited

In Payment Record tab you can check and add payments to the PO

To add new Payment, click on the green +PAYMENT button
and in the pop-up enter the desired data
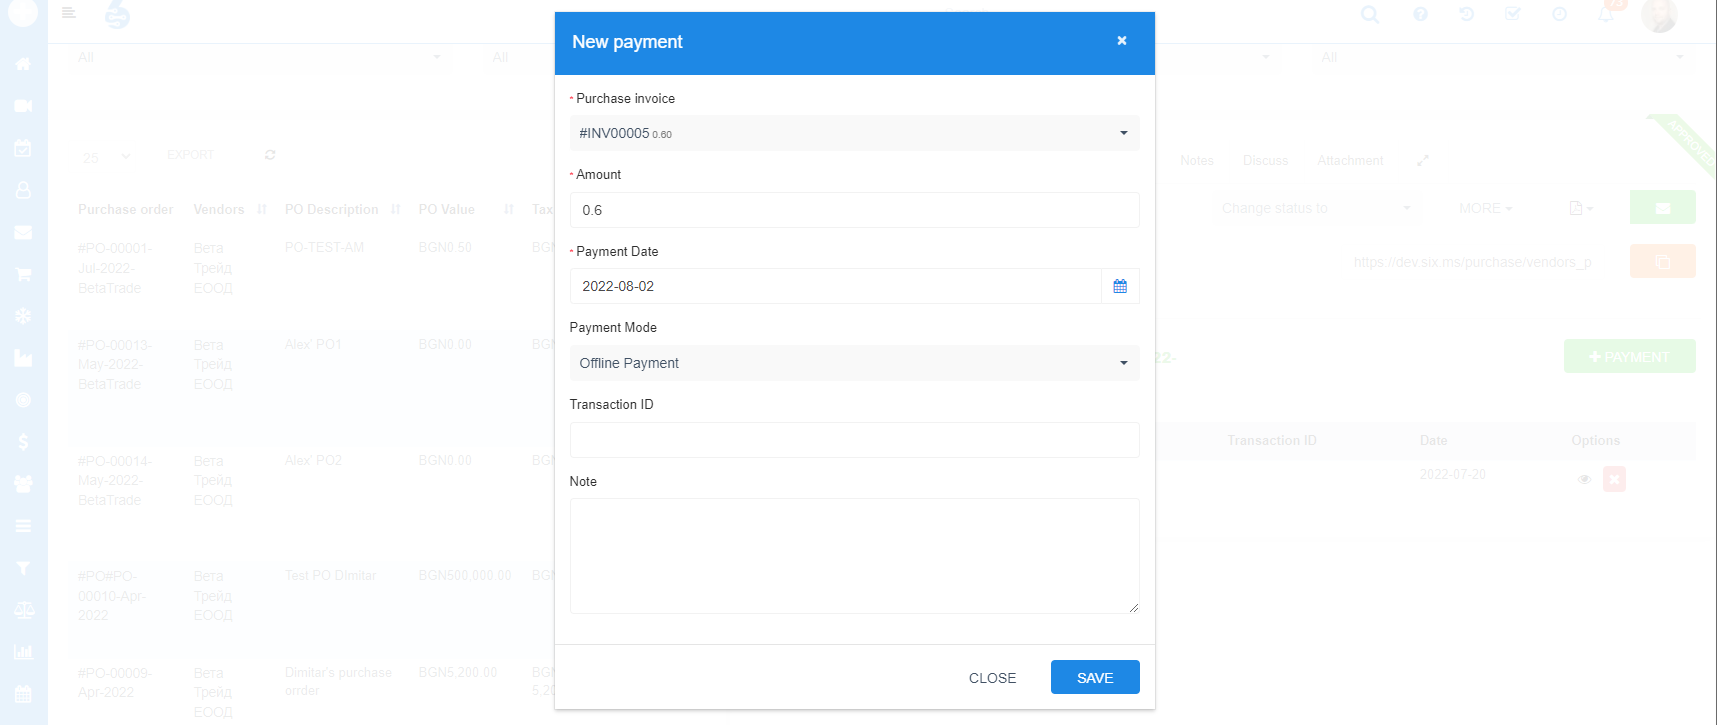
To complete the payment, you need to enter:
- Purchase invoice
- Amount
- Payment date
and to choose Payment method. Then click on Save.
In Reminder tab you can set a reminder to PO related persons.

Click on Set Estimate reminder to create a new one. You can choose date and person, who to be reminded about PO related task/activity
If PO is related to particular project task, you can create it from Tasks tab

The process of new task creation you can find in Task Management section
Notes, which are visible only internally can be attached to each PO

To add a new note, click on ADD NOTE button.
Internal ddiscussions related to the PO can be handled in Discuss tab

To leave a new comment or to reply to existing, type a text in the text input field and press ADD COMMENT button.
To attach a file to the PO, go to Attachment tab

Choose file from your local computer by clicking "Choose file" button. Then click on SAVE
To create a ne Purchase Order, click on NEW button in the upper left corner of the sccreen

In the PO creation creen fill in the prerequisites:
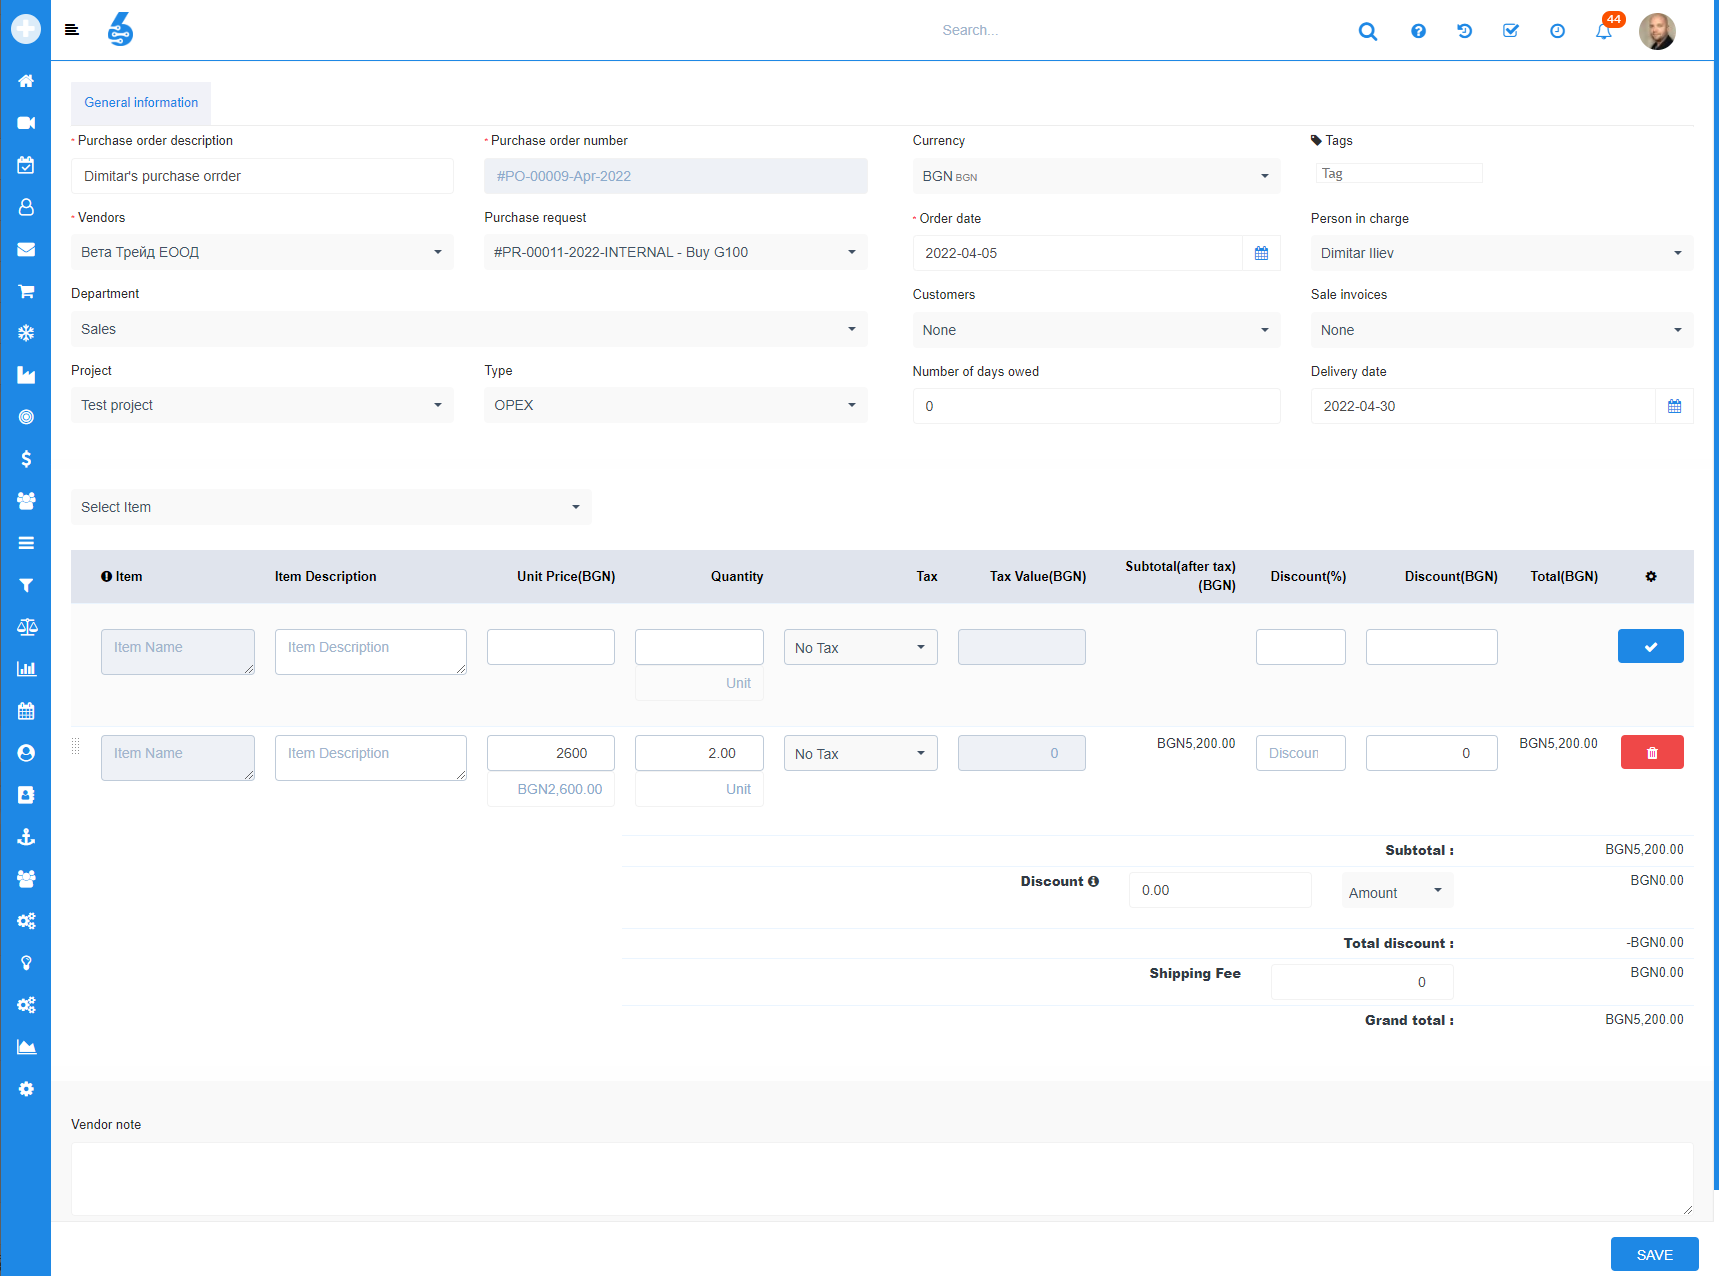
Mandatory fields are:
- PO Description - which is the label/title of the PO
- PO number - generated by the system
- Vendors - choose the vendor from which the items would be purchased
- Order date - choose the date on which the order is taking place
From dropdown Select items, that are available in the Vendor's list and PO
When the item is selected, modify price, quantity, taxes, and discounts if needed.
 Then click SAVE
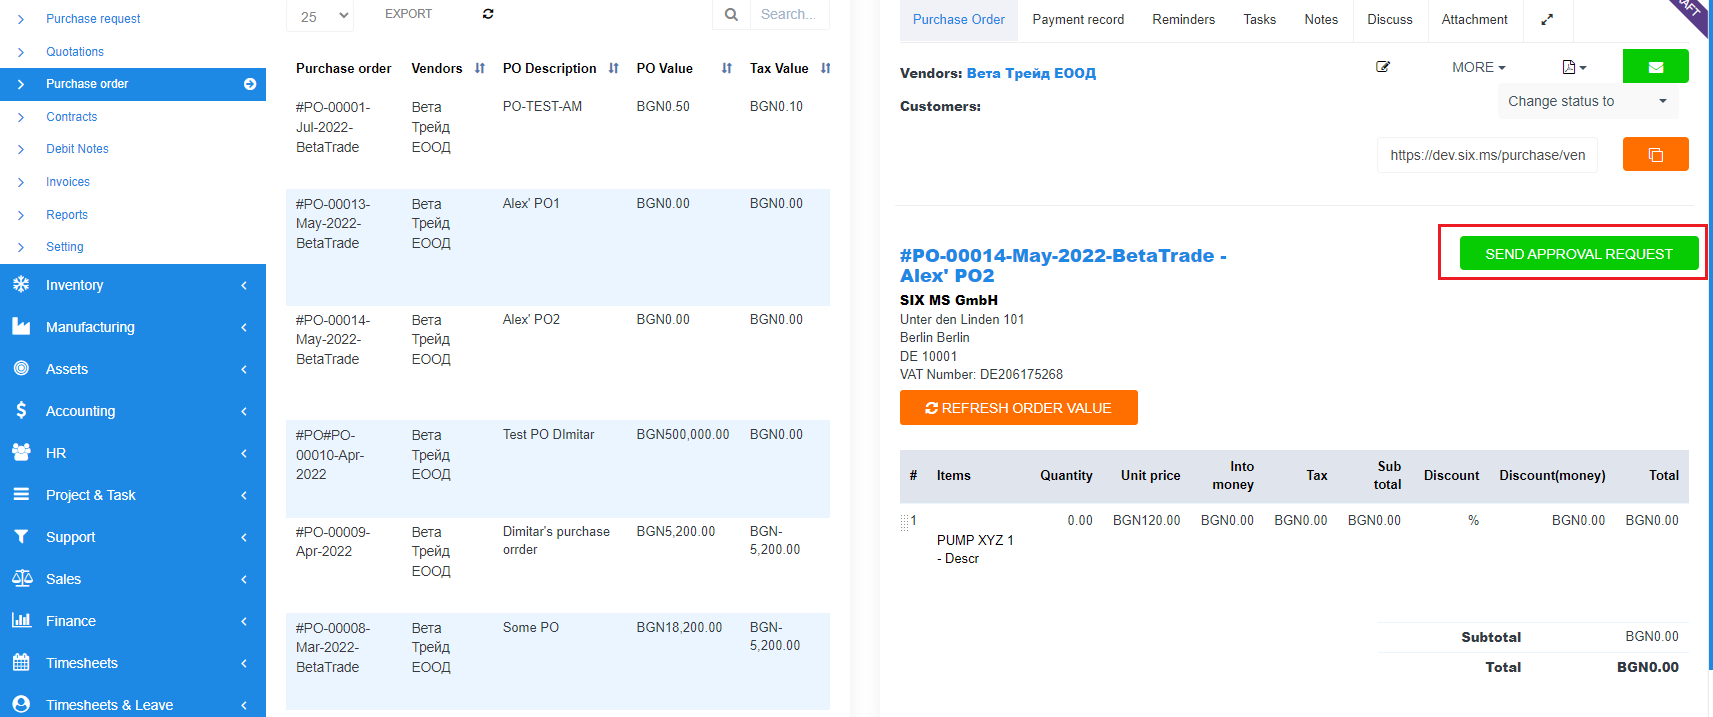
Now PO can be approved and send to the vendor. To acquire an approval, click SEND APPROVAL REQUEST button:
