
Quickly Learn to use SIX ERP
Lead Management
Lead Management
Introduction
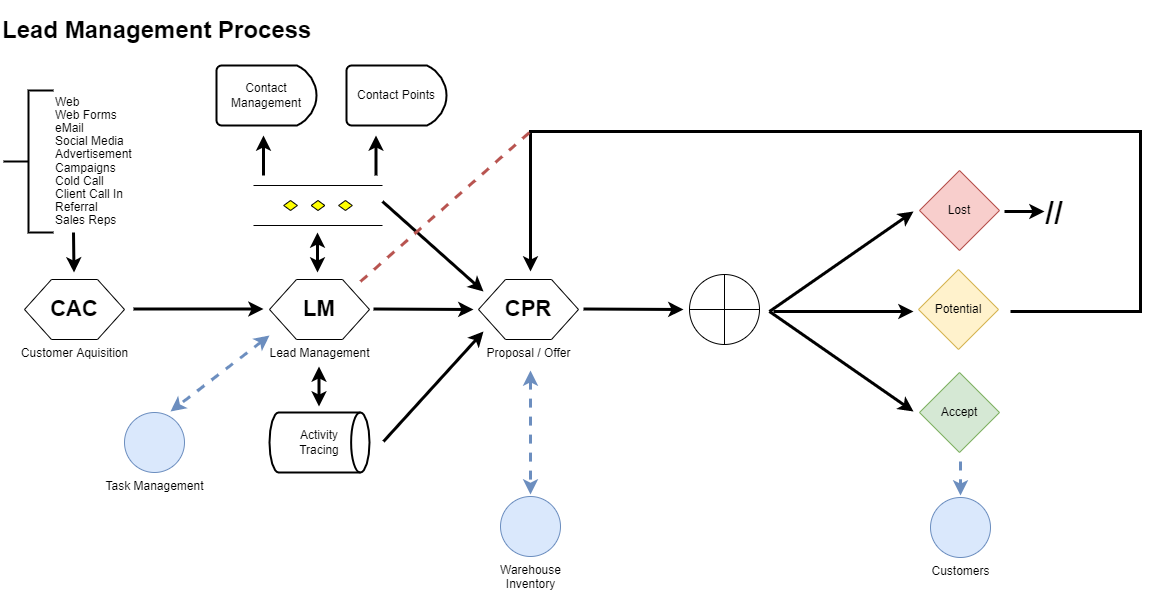
The "Leads" or "Potential Client" Data entity is a multi-relational data entity which by means of processes interconnects with the "Clients" or "Customers" entity and allows a clear separation between active and buying customers and potential.
Customer aquisition is a multi-dimensional process with many very individual processes and steps attached to it, therefore a fine-grained process adds additional granularity into the individual steps of sales and aquisition.
Below process diagram depicts a typical Lead flow process, inclusive activities involved in an aquisition process.
Adding a new Lead
A lead is typically defined as a Potential Customer. Managing Leads is generically simple. For starting to create a new lead you can:
A) Select the Customers menu from the left side menu and click on the sub-item Leads. In the opening, screen click on the "NEW LEAD" button. - or -
B) Click the SHIFT + L keys on your keyboard which will open the Leads dialog from any place inside the system.
C) Click ALT + L on your keyboard and manually select the "NEW LEAD" button.
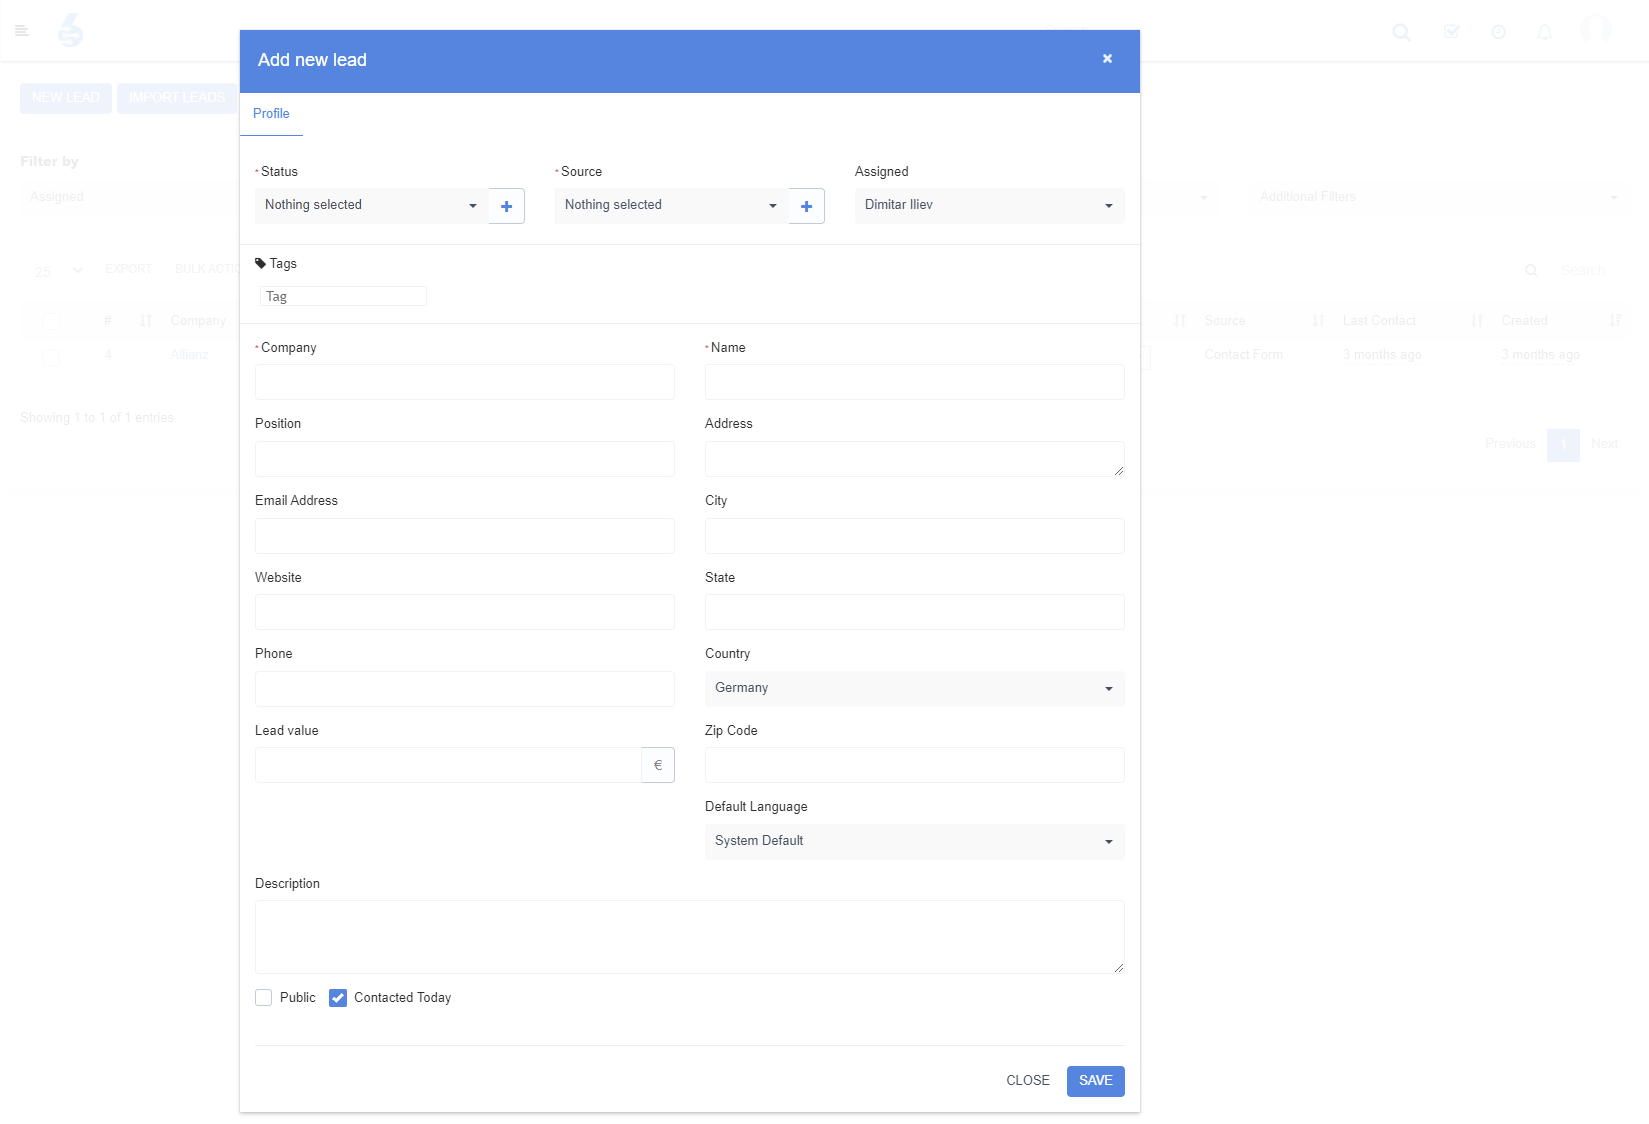
Required entry fields for adding a new potential customer are:
- Status - Custom Statuses can be defined, to monitor the lead acquisition.
- Source - Where did you acquire the lead from
- Company Name - Name of the Company
- Name - of the Contact Person.
Depending on your company structure, please select the Lead status (Public or Private). In case only certain sales staff maintains their own leads, do not tick the Public Checkbox ![]() . Public generically means that any person in a Sales hierarchy has access to the lead, whereas not ticking it means only the assigned staff member (self or other) can work with this potential client.
. Public generically means that any person in a Sales hierarchy has access to the lead, whereas not ticking it means only the assigned staff member (self or other) can work with this potential client.
Additional fields are available, please ask Sales to fill in as many as possible. Once you click the "SAVE" button, you will have some additional data entities available to maintain your lead relations.
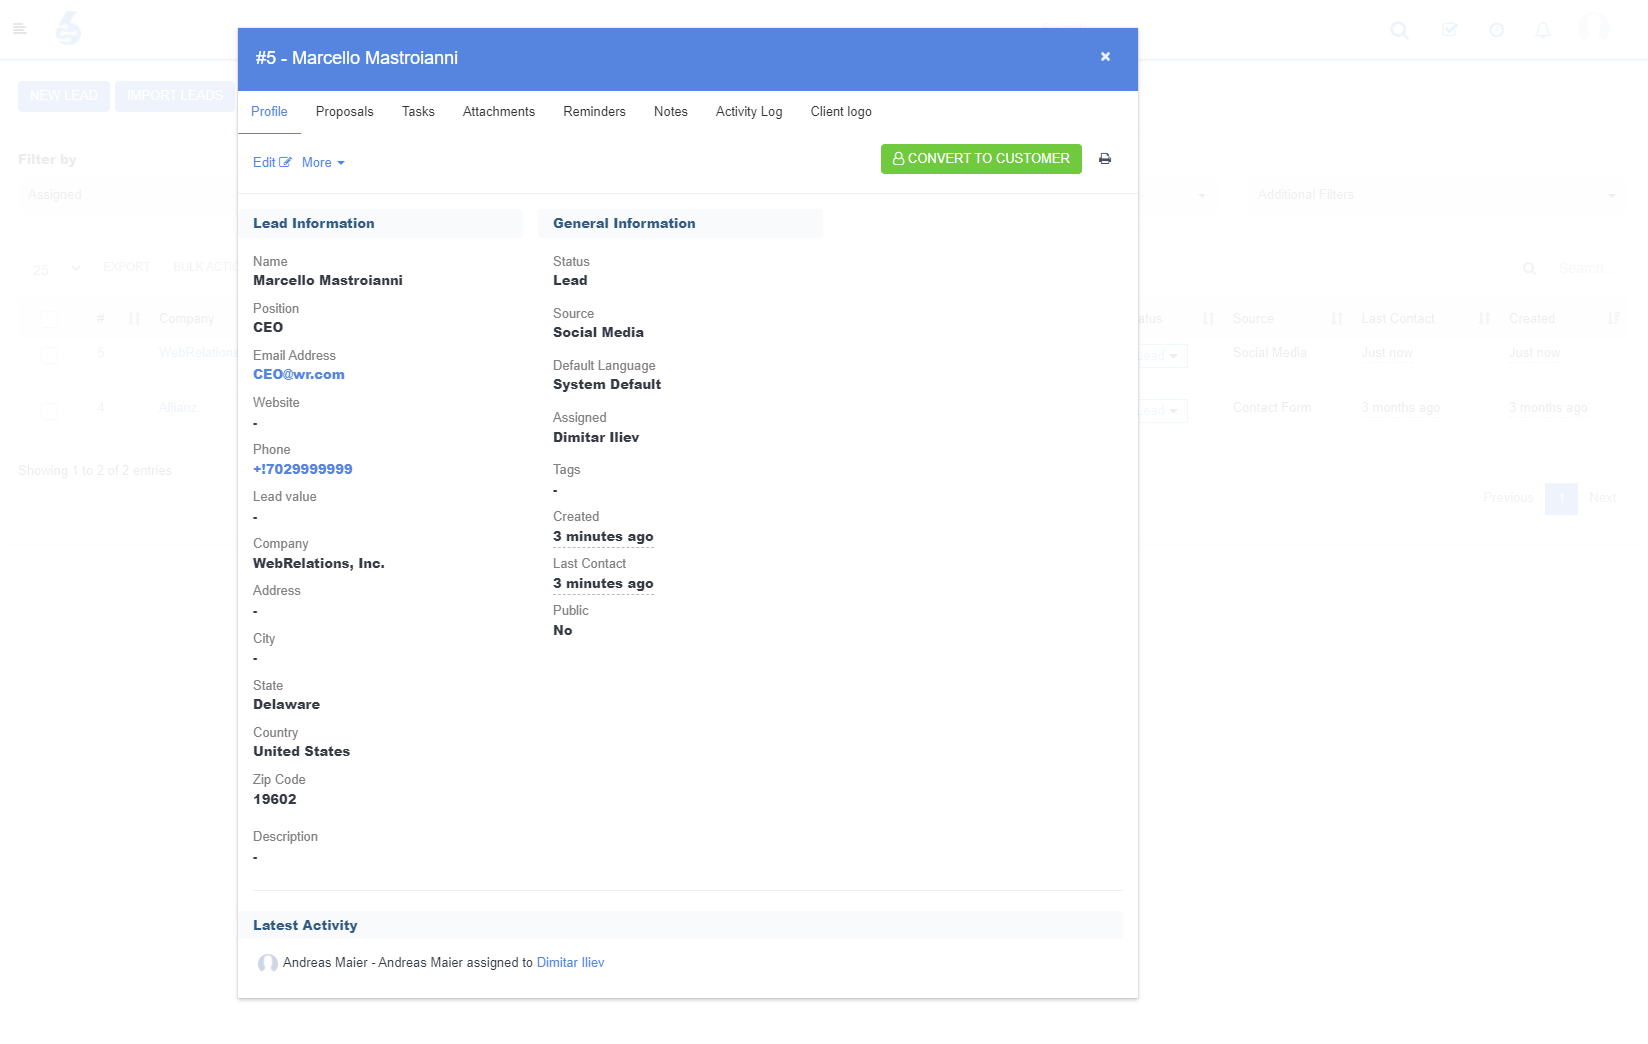
You can now maintain:
- Proposals - Directly create Economic Proposals for your leads.
- Tasks - Often there are dependencies. Create Tasks for co-workers to help you out.
- Attachments - attach any information, Word Documents, PDFs, XLS files.
- Reminders - Set reminders to never forget to follow up actions - after all, potential clients need to be nurtured.
- Notes - Add notes to not forget what your lead told you. Remembering client information is essential to do the final sale.
- Activity Logs - See trace records of all client activities
- Client Logo - Customize Client Proposals with the clients' logo. People love to see that you care!
Leads Dashboard
To get an overview of leads click on the customer's menu entry in your left side menu, and then select the "Leads" entry. Alternatively, press the key combination ALT + L to get to the leads dashboard.
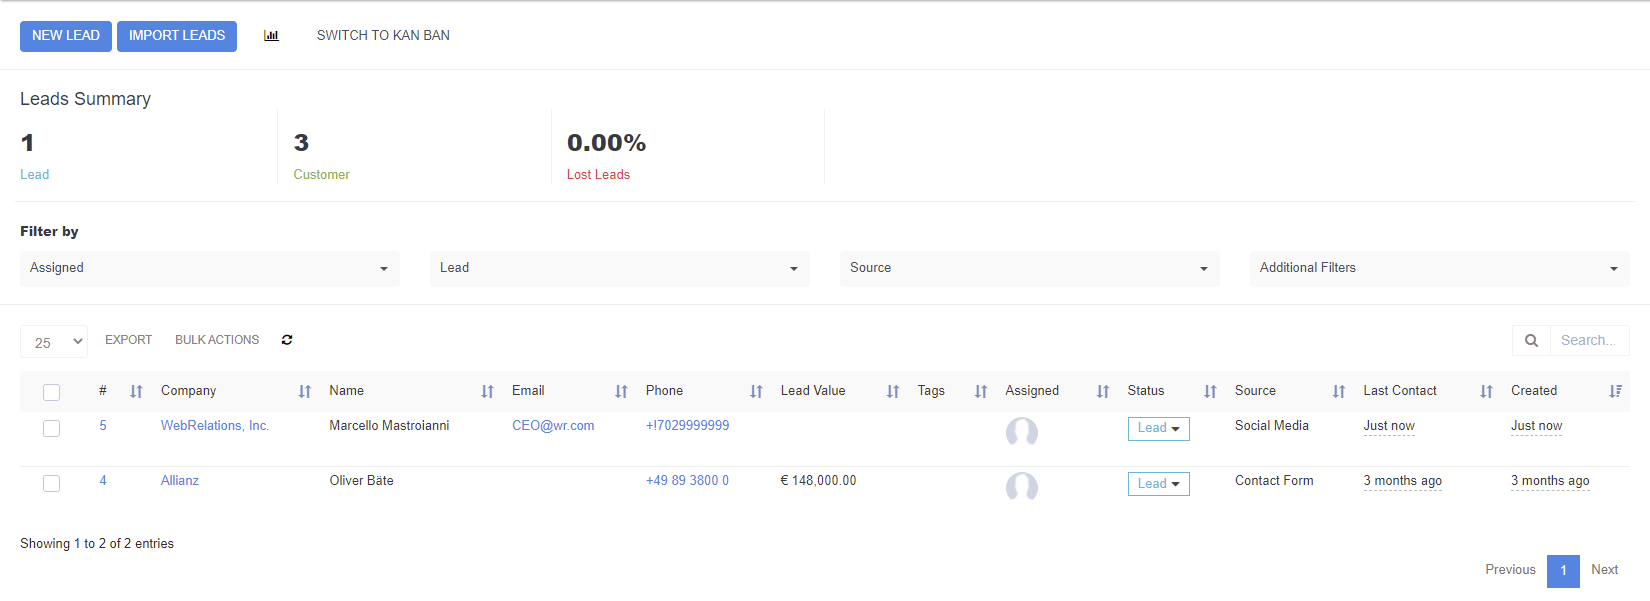
Leads can be viewed in 2 alternative ways to depict the pathway. Solution 1 is a list view, and Solution two is the KanBan view. Depending on your acquisition process, and the more steps you declare between initial contact and final sale, you may choose between either.
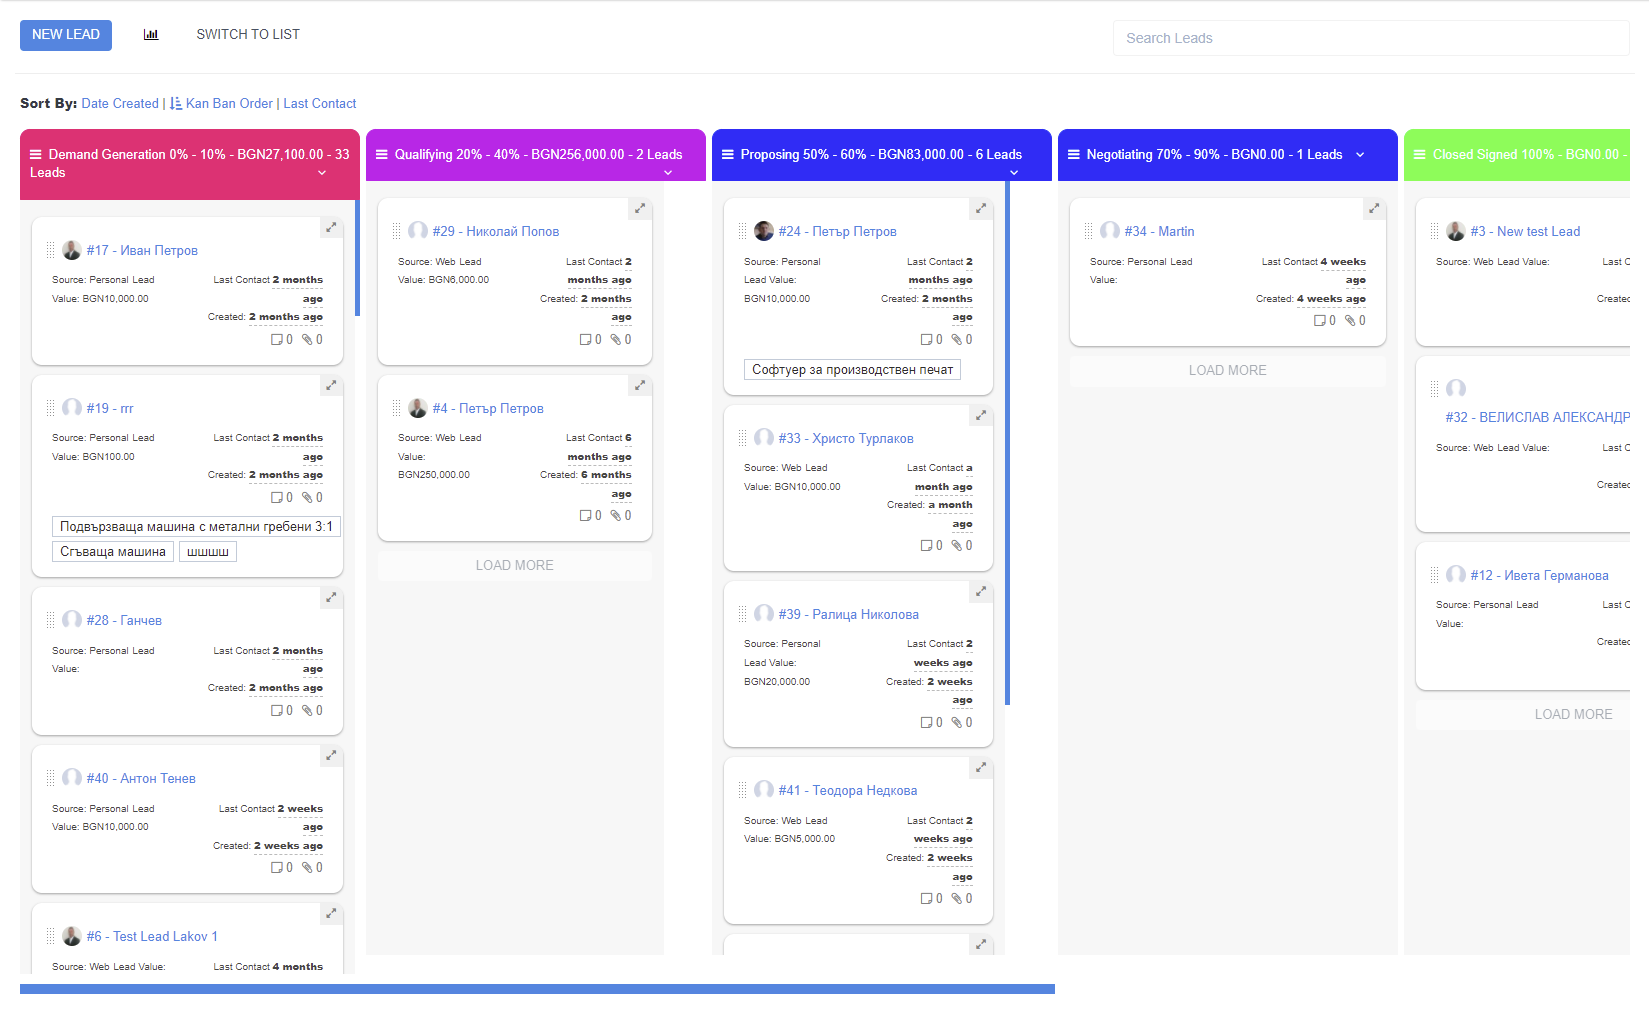
KanBan view allows an easy "drag and drop" mechanism to move leads through the sales pipeline, according to their current stage.
Editing Leads
In order to manage leads and get an overview of all your potential customers please go to the Leads Dashboard. To enter the leads dashboard click ALT - L or select Customers → Leads from the left side menu. Then select the Lead in question and click either on the Leads name or by hovering over the Lead's name click "Edit".
Managing Lead Pipelines
Leads commonly follow a sales pipeline, starting from
- Demand Generation,
- Lead Qualification,
- Proposing,
- Negotiation
- Signing the deal,
however, in some cases, we receive false positives, Lose a Potential Client or requests are just Junk. In either case, we'd like to get those deals out of the actual pipeline. When such a case is identified, sales staff should take action and mark the lead as such.
In order to mark a lead as Junk, select the lead by clicking on the ![]() checkbox beside the Lead Name (Company Name), then select "BULK ACTIONS" and tick the "Mark as Lost". Once confirmed, the lead will be hidden from the pipeline.
checkbox beside the Lead Name (Company Name), then select "BULK ACTIONS" and tick the "Mark as Lost". Once confirmed, the lead will be hidden from the pipeline.
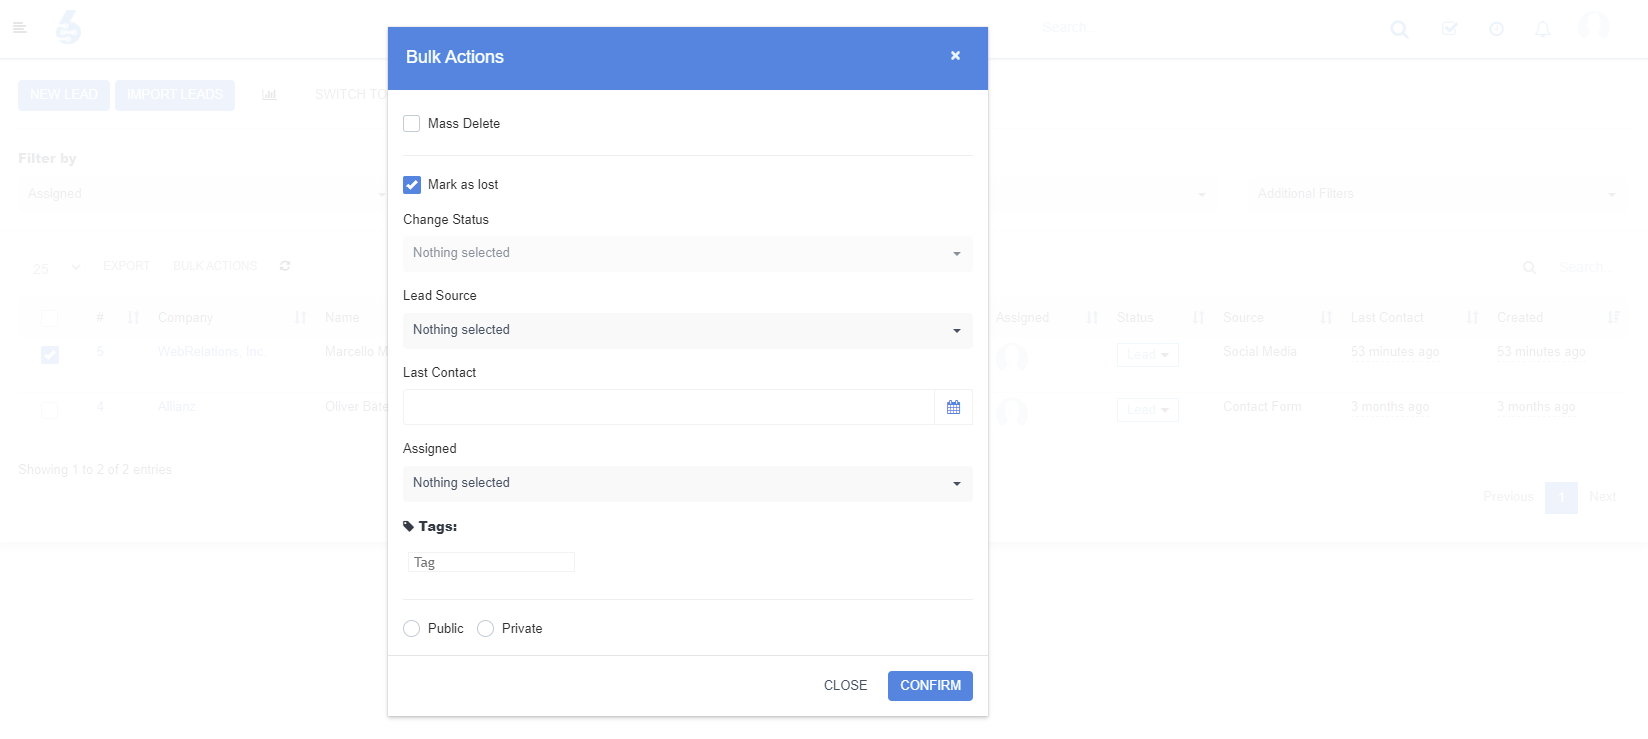 Depending on your user privileges, you will be able to also set various other statuses of the lead or even delete the lead in its entirety.
!!! We do not recommend deleting Leads but marking them as Lost or Junk, which is the better practice !!!
Converting Leads to Customers
Once a Lead has accepted a proposal, or in general bought products or services from you, it is time to convert the "Potential" into a "Customer". Conversion has multiple purposes, but the main purpose is more fine-grained management of the now Customers' data. By opening a Leads Card, click on "CONVERT TO CUSTOMER".

All data relating to the lead will now be transferred into a full customer automatically, and all data will be ported over. You can now maintain data within the Customers Section.
Effective Lead filters
When 100s or thousands of Leads end up in your sales pipeline, filtering them by advanced criteria becomes an important aspect of day-to-day work.

Why use lead filters
An extensive collection of filters, which can be used one by one - or combined all together will give your filtering a greater meaning, while drilling down on clients who want to work with you.
To start using lead filters, select the criteria from the available drop down fields. Fine tuning combined data points can drastically change returned results.
Availble Seach Criteria:
- Staff Members - Select any staff member, or combine several members together in a single seach
- Lead Status - Lead Statuses are freely definable Status indicators. Use Lead statuses to group potential clients into groups defining the stage in a sales process.
- Lead Source - Leads derive from sources. Such sources are freely definable, depending on your markting campaigns and distribution.
- Country, State, City, Postcode - International Companies work across countries, states and cities.
- Tag - Tags are free text secondary grouping identifiers, which can be used literally for any purpose.
- Lead Type - Lead Types are filters indicating the primary state of a lead. Commonly "Lost", "Junk", "Public", and "Not Assigned" are indicators of leads.
- Date - Selector to filter by date when the lead was added to the system, or last contacted.
- Period - Period defines the time frame based on which a search is executed. When selecting "Period" from the list you will be able to input specific date ranges.
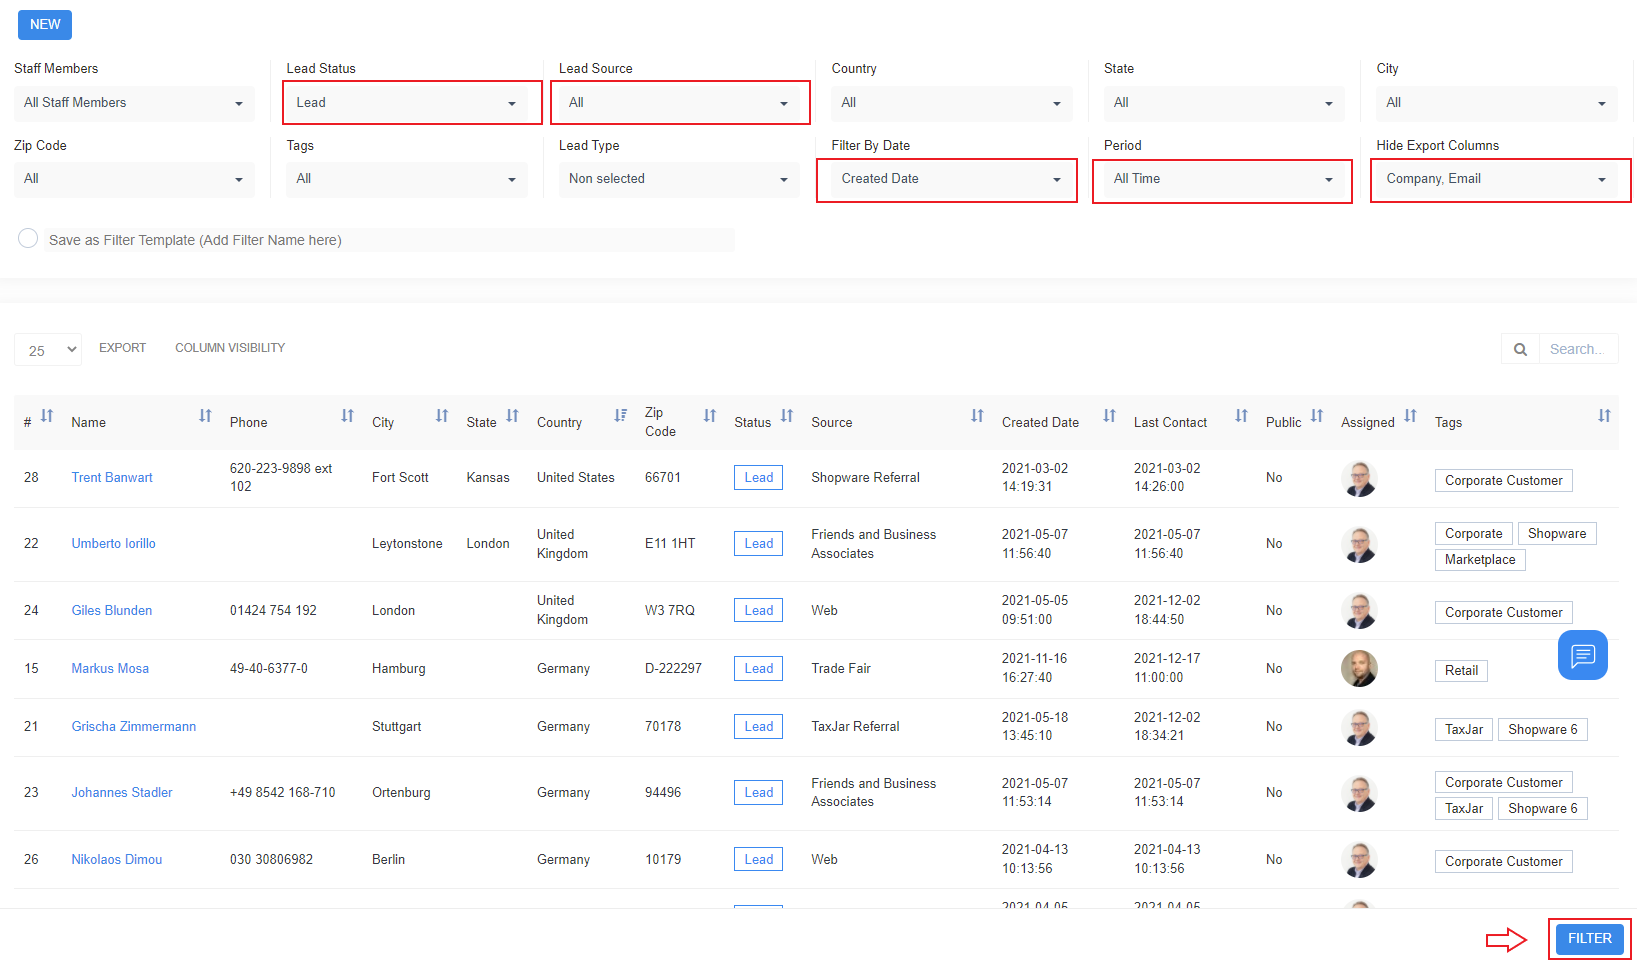
Available filters and selectors will vary in between organizations and set-ups. Once criteria is selected press the "Filter" button at the right bottom of the dialog.
Managing filters & Filter Templates
You will repeat certain searches frequently. Selecting all options over and over again. Therefore SIX allows you to store searchs, which can be re-used later. Examples of such a search is eg. a search to check on your sales team and their performance the previous month.

To store a custom search, fill in all search Criteria, tick the checkbox, type a name for the custom search, and then click "Filter" at the bottom right of the data screen.
Re-using stored Filters
Stored filters can be accessed in two different ways: On top of the seach screen find the ![]() icon and then select the respective entry from the list of previously stored filters.
icon and then select the respective entry from the list of previously stored filters.

Deleting Stored Lead Filters
Head to Customers → Lead Filter Templates, hover over the respective entry and click "Delete".